Instant Pot Hot Chocolate Cheesecake with Marshmallow Ganache
A hot cup of cocoa turned into a cheesecake!
- Prep Time: 20 minutes
- Cook Time: 30 minutes
- Total Time: 60 minutes
- Yield: 8-10 servings 1x
- Category: Dessert
- Method: Pressure Cooker
- Cuisine: American
Ingredients
Scale
For Crust
- 1 ½ cups crushed Oreo Cookies (I throw the whole package in a blender and freeze what’s leftover)
- 3 tablespoons butter, melted
For Cheesecake Filling
- 2 8-ounce packages cream cheese at room temperature (Philadelphia Brand if possible)
- ⅓ cup sugar
- ½ cup marshmallow cream, room temperature
- ⅓ cup hot cocoa mix
- 2 teaspoons vanilla extract
- 3 large eggs at room temperature
For the Marshmallow Ganache
- 4 ounces white candy melts, roughly chopped or white chocolate chips (see note)
- 1 cup marshmallow cream, room temperature
- ⅓ cup heavy whipping cream
Instructions
- Spray a 7-inch springform pan with nonstick cooking spray. If desired, line the bottom of the pan with parchment paper for easy removal of the cake once it’s done.
- To make crust: Stir cookie crumbs and melted butter together and press evenly across the bottom of the pan. Place in the freezer to set, while you prepare the filling.
- To make cheesecake filling: Cream the cream cheese and sugar with a handheld mixer until very smooth; scrape the bowl and mix again.
- Add marshmallow cream, hot cocoa mix, and vanilla extract; mix until smooth, scraping the sides at least once to make sure everything is well incorporated.
- Add eggs, use hand mixer to barely combine, about 5 seconds, then stir in the rest of the way with a spatula.
- Remove the pan from the freezer and fill with the cheesecake mixture.
- Add 1 1/2 cups of water to the pressure cooker pot and place trivet inside.
- Carefully lower the prepared pan onto the trivet.
- Secure the lid and turn pressure release knob to a sealed position. Cook at high pressure for 30 minutes.
- When pressure cooking is complete turn the pressure cooker off. Use a 10-minute natural release and then release any remaining pressure.
- Remove pan from pressure cooker and place on a cooling rack. Use a paper towel to soak up any excess water from the top of the cake. Let it cool on a cooling rack for about an hour.
- Cover and place cheesecake in the refrigerator and chill for at least 4 hours or overnight.
- Once the cheesecake is chilled, prepare the Marshmallow Ganache: Place candy melts or white chocolate chips in a heat safe bowl.
- In a small pan on the stove top, heat whipping cream over medium high heat until bubbles form around the edges.
- Pour whipping cream over the chocolate. Top with 1 cup marshmallow cream and cover the bowl tightly for 3-4 minutes until the chocolate is melted. Whisk until smooth.
- Cool 30 minutes or so until it’s thick and at room temperature. You want it to be thick, yet pourable.
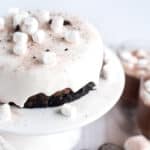
- Remove the ring from the cheesecake. Slowly pour the ganache into the center of the cheesecake. It should naturally start to drape over the sides of the cheesecake. If needed, tip the cheesecake from side to side to encourage the ganache to spill off the sides a bit. If it’s running quickly off the cake, stop, chill the ganache in the fridge, then try again.
- Refrigerate for at least an hour to set the ganache. Decorate the top with mini marshmallows and a sprinkle of cookie crumbs; serve.
Notes
- The hot cocoa mix I use contains sugar, nonfat milk, cocoa, and salt. I’m not sure if additional ingredients in the hot cocoa mix would make a difference in the outcome or not.
- I like to use Ghirardelli White Melting Wafers to make the ganache. They taste good and are a true white color. White chocolate chips and white chocolate bars are a cream color and you will need to add white food color gel to it if you want a true white.
- The trick to the ganache is to have it cooled enough that it is very thick, but pourable. When poured into the center of the cold cheesecake, it will very slowly drape over the sides of the cake, stopping before it hits the bottom of the pan. If it’s too thin, it will all pour off the sides of the cheesecake and you’ll end up with most of your yummy ganache on the counter.
- The cheesecake can be eaten right after the ganache is poured over top, but it’s a bit messy. Chilling the ganache will help set it so your slices are clean and pretty.