
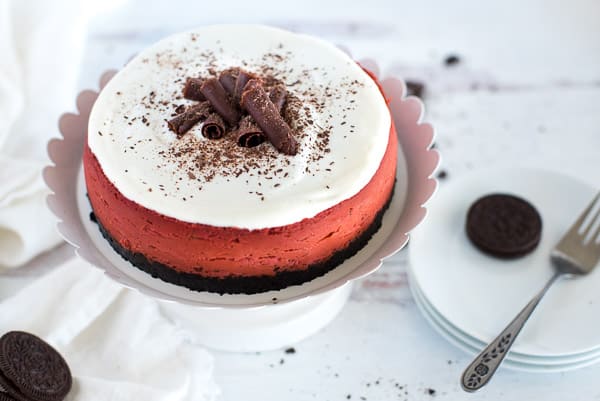
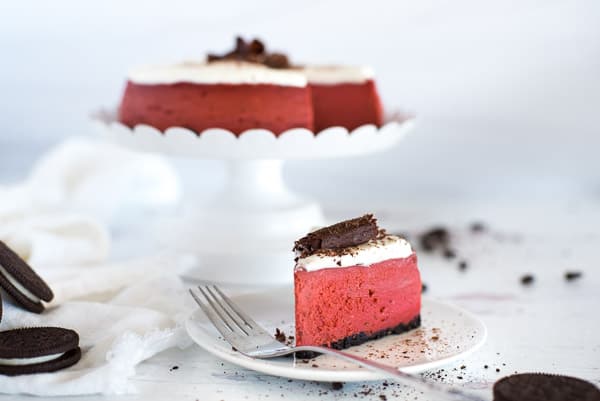
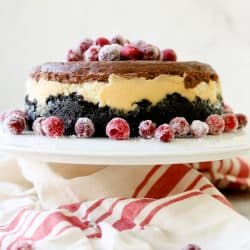
Instant Pot Red Velvet Cheesecake is a gorgeous dessert sure to make any occasion memorable. If the colors don't make you swoon, the rich chocolate taste surely will!

Red Velvet. Whoever came up with the name “Red Velvet” for a dessert is some kind of marketing genius.
For years I've wondered what the Red Velvet fuss is all about. I mean, we all know it's simply another chocolate dessert, but tint it red and layer it with pure white frosting or cream and suddenly that plate of fudgy chocolate brownies sitting next to it looks like the most boring treat at the party.
From my experience of watching way too many Food Network cooking competitions, the winning dishes ignite all of the senses – which must be why Red Velvet continues to wow after so many years.
We HEAR the name Red Velvet and our imaginations are intrigued.
We SEE the Red Velvet dessert and we are entranced by the colors.
Then we SMELL and TASTE the rich chocolaty creation enveloped in waves of cream.
And suddenly everybody is loudly proclaiming “Red Velvet is my favorite dessert of all time!” while simultaneously thinking, “Wait, what exactly is Red Velvet Cake made of anyway?”
Of course, at which point you're going to have that moment where you ponder on how healthy it could possibly be to eat that much red food coloring . . . buuuuuut we're not going to go there because today we want bright red cake and we want it now. Agreed?
If you are part of the Red Velvet cheering squad, this recipe is for YOU! You may also want to check out my Instant Pot Red Velvet Creme Brulee – also heart eyes 🙂
I first wrote a version of this cake for my cookbook Instantly Sweet. I felt it was oh so fitting to share it again on TIDBITS for my second favorite holiday of all time: Valentine's Day!
WHY YOU WILL LOVE INSTANT POT RED VELVET CHEESECAKE
- IT'S CHEESECAKE IN AN INSTANT POT: I don't know at what point someone discovered that cheesecake worked so well in a pressure cooker, but the creamy, smooth texture is unique and beyond comparison. If you've been waiting to try this out, this is your day!
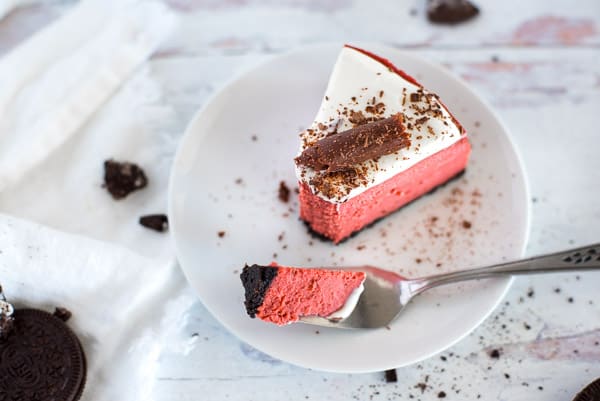
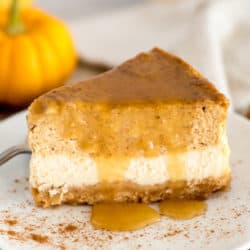
- PRETTY: Deep dark crust, bright red cheesecake, and white whipped cream. Just try and not be blinded by the halo.
- TASTY: Under the red exterior lies a rich chocolatey cheesecake that somehow tastes approximately 500x better because it's chocolate in disguise.
- ROCKSTAR STATUS: When you put this beauty on the table, you better believe people will be looking at you like you're a master in the kitchen.
HOW TO MAKE CHEESECAKE IN THE PRESSURE COOKER
- Make the crust and press into the pan
- Beat cream cheese and sugar until smooth
- Add remaining ingredients and beat until smooth (Note: add eggs last and stir just until incorporated)
- Stir in melted chocolate
- Pour batter over crust
- Pressure cook your red beauty
SEE RECIPE CARD BELOW FOR DETAILED COOKING INSTRUCTIONS
TIPS FOR MAKING THE BEST RED VELVET CHEESECAKE
- ROOM TEMPERATURE INGREDIENTS: It can't be said enough, when making cheesecake, always use room temperature cream cheese and eggs. This will give you the smoothest texture without the risk of over beating and getting too much air in your cheesecake batter.
- DON'T OVERBEAT: Speaking of over mixing, specifically after you add the eggs, be sure to gently combine the ingredients just until incorporated. Over mixing adds air to the batter which will be the cause of it overflowing while cooking. However, if this happens to you, have no fear. Chill the cheesecake, cover with cream to serve and it will look and taste beautiful.
- FOOD COLORING: The recipe calls for liquid red food coloring. If you want a more intense red color, look for red no-taste gel instead.
- MORE ON FOOD COLORING THOUGHTS: If you prefer to not use artificial coloring in your cheesecake, there are some impressive all natural food dyes available. I don't have a lot of experience with them, but this brand worked great for sugar cooking frosting. If you just want a really amazing chocolate cheesecake, go ahead and omit the food coloring from this recipe entirely. It won't make a bit of difference in the taste and incredible texture.
- NATURAL RELEASE VS QUICK RELEASE: I'm convinced quick releasing the pressure also contributes to a cheesecake that rises then falls. I wait at least 15 minutes once the cook time is done, then I very, VERY slowly manually release the remaining pressure.
HOW TO STORE AND FREEZE CHEESECAKE
- Store: Place cheesecake in an airtight container and store in the fridge for up to 5 days. I like to use a round bowl to store cheesecakes. Place the cake on the lid, then invert the bowl to cover it. Just make sure no one comes by later and unknowingly flips the bowl right side up!
- Freeze: Note: the cheesecake freezes better without the whipped cream topping. It can be frozen whole or in slices. To freeze in slices, cut wedges of cake and place pieces of parchment paper between each slice, then freeze. Cover tightly with plastic wrap and place inside a freezer-safe container for up to 3 months. To thaw, place in fridge overnight.
MAKE AHEAD TIPS FOR RED VELVET CHEESECAKE
To simplify the process, when I make cheesecake, I start in the morning. Take cream cheese and eggs out of the fridge first thing and process cookies into crumbs. Make the crust and store the pan in the fridge or freezer until you're ready to add the cheesecake batter. If the crust is chilled, it won't crumble when the batter is added.
Cheesecake can be made up to 3 days in advance and stored covered in the fridge. Prepare whipped cream just before serving.

VARIATIONS OF RED VELVET CHEESECAKE
- RED VELVET CAKE WITHOUT THE DYE: As I mentioned, the food coloring can be omitted for a classic chocolate cheesecake. I suggest you don't try and call it Brown Velvet Cheesecake though. My experience tells me that title doesn't have the same effect. Go with Chocolate Lovers Cheesecake instead 🙂
- SWAP THE TOPPING: I prefer a lightly whipped cream contrast to the ultra-creamy cheesecake, but other toppings ideas include white chocolate ganache (Instantly Sweet page 42), marshmallow ganache, sweetened yogurt, or cream cheese frosting.
- THE BLING: Garnish the cheesecake with homemade chocolate curls (or store bought) or edible gold glitter.
Food is, and forever will be, my favorite way to show those around me how much I care about them. Why not kick that up a few notches by gifting them a cheesecake that screams the color of love.
I hope you enjoy this as much as my family and friends! This one is for all the Red Velvet lovers out there. Enjoy!
MORE INSTANT CHEESECAKE RECIPES
- Instant Pot Banana Cream Pie Cheesecake
- Instant Pot White Chocolate Raspberry Cheesecake
- Instant Pot Funfetti Cheesecake
- Instant Pot White Chocolate Lemon Cheesecake
TOOLS/INGREDIENTS USED TO MAKE INSTANT POT RED VELVET CHEESECAKE
Instant Pot Red Velvet Cheesecake
Elegant, beautiful Red Velvet Cheesecake with a creamy, decadent consistency that can only be achieved in an Instant Pot.
- Prep Time: 20 minutes
- Cook Time: 35 minutes
- Total Time: 60 minutes
- Yield: 8 servings 1x
- Category: Dessert
- Method: Pressure Cooker
- Cuisine: American
Ingredients
For the Crust
- 1 cup Oreo cookie crumbs (about 12 cookies)
- 2 tablespoons butter, melted
For the Filling
- 1 cup milk chocolate chips
- 2 (8 ounce) packages of cream cheese, at room temperature
- 1/3 cup sugar
- ¼ cup 2% or whole Greek yogurt
- 1 tablespoon cornstarch
- 1 teaspoon red food coloring
- 1 teaspoon vanilla extract
- 2 eggs, at room temperature
For the Vanilla Whipped Cream
- 1 cup heavy cream
- ¼ cup powdered sugar
- ½ teaspoon vanilla extract
Instructions
- Coat a 7 inch springform pan with a non-stick spray.
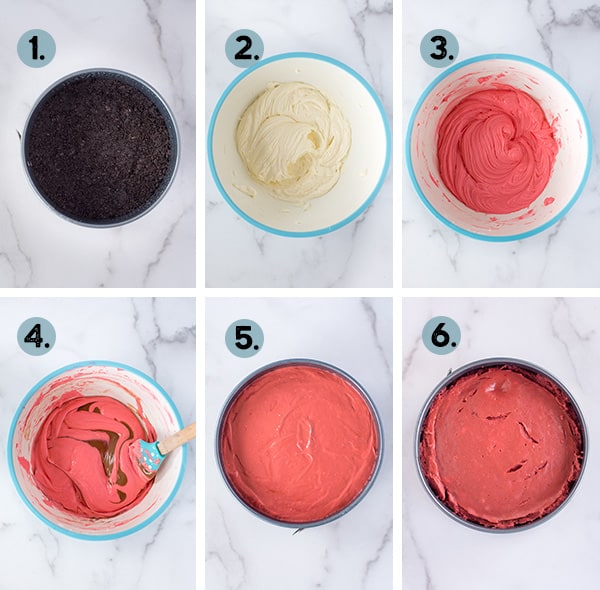
- In a small bowl, combine the cookie crumbs and butter. Press crumbs in an even layer in the pan. Place in the freezer for 10 minutes.
- Place milk chocolate chips in a microwave safe bowl and microwave for 1 minute. Stir and microwave another 30 seconds if not completely melted. Set aside to cool.
- In a large bowl, with a handheld electric mixer, mix cream cheese and sugar at medium speed until smooth. Blend in yogurt, cornstarch, red food coloring, and vanilla.
- Mix in eggs, one at a time, just until blended; don’t over mix.
- While gently stirring, pour in melted chocolate and stir just until blended.
- Pour batter over the crust.
- Pour 1 cup of water into the pressure cooking pot, and use a sling to place pan inside the pot. If you don’t have a sling, place a trivet in the bottom and use a foil sling to place the pan on top of the trivet.
- Secure the lid and turn pressure release knob to a sealed position. Cook on high pressure for 35 minutes.
- When pressure cooking is complete, turn the pressure cooker off. Let pressure release naturally for at least 15 minutes, then quick release any remaining pressure (release the pressure slowly so the cake doesn’t rise then fall).
- Remove cheesecake and check to see if the middle is set. It should jiggle slightly, but not be raw batter. If needed, cook the cheesecake an additional 5 minutes.
- Use the corner of a paper towel to soak up any water on top of the cheesecake.
- Remove the springform pan to a wire rack to cool. When cheesecake is cooled, refrigerate covered with plastic wrap for at least 4 hours or overnight.
- When chilled, prepare the Vanilla Whipped Cream. In a medium bowl add heavy cream, sugar, and vanilla extract. Whip with an electric hand mixer until it just starts to thicken. Spoon over the top of the cheesecake and smooth cream to the edges of the cake.
- Refrigerate until ready to serve. Garnish with chocolate curls or shaved chocolate if desired.
Notes
- Always use room temperature cream cheese and eggs for an extra smooth batter.
- Once you add the eggs, be careful not to overmix the batter.
- When quick releasing the remaining pressure, do it slowly. This will prevent the cheesecake from expanding then falling and looking like a mess when you open the pot.
- I prefer a lightly whipped cream to pour over top. If you prefer a thicker cream to serve with individual slices or to decorate with, whip the cream until it’s thick.


Oh my! This is not doing my diet any good! I can’t wait to make this one! Yum!
Cecilia, It’s doing your life good, hence good for your diet 🙂