


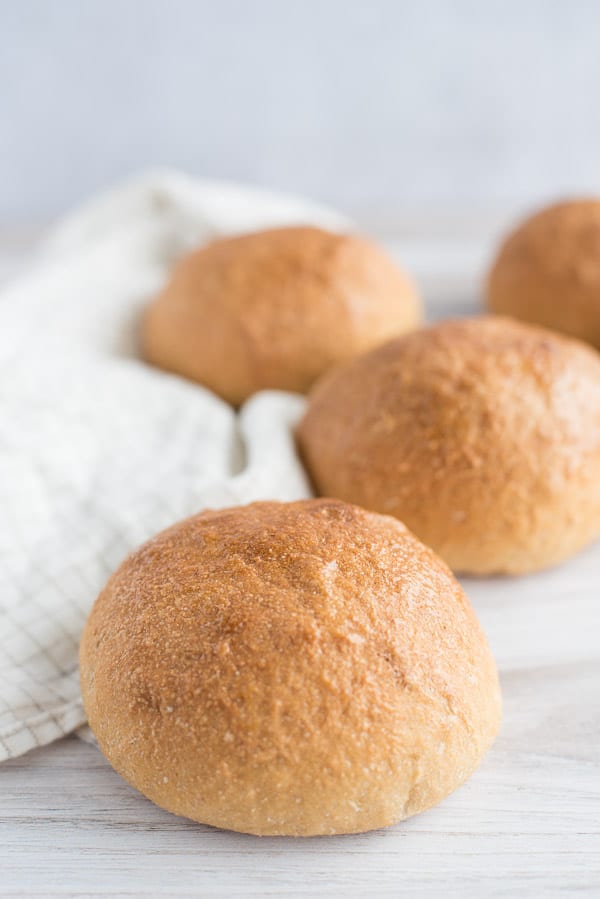
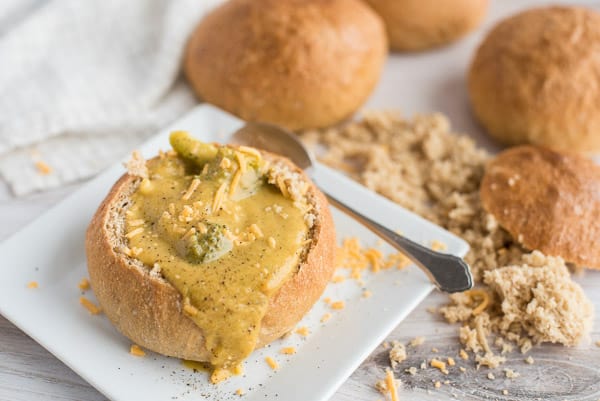
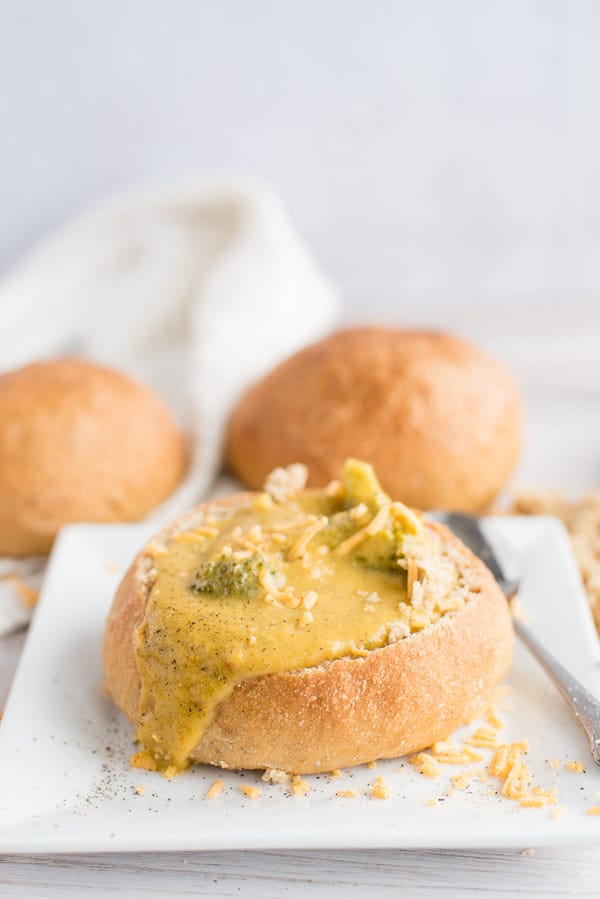
Whole Wheat No-Knead Bread Bowls are here to make soup season the best season of all! Crusty on the outside, warm and soft on the inside, AND these Bread Bowls are quicker and easier than traditional No-Knead Bread. Keep reading to see how I put the Instant Pot to work!
It's that time again!!! “Soup's on January” is here and I couldn't be more excited.
For the past two years I've dedicated all of January to Healthy Soup Recipes and Soup Side Dishes to along with them.

We're starting out with a new family favorite: Bread Bowls! But not just any bread bowls. Crusty, artisan-style bread bowls!
Do you know the biggest problem with hot, fresh out of the oven, crusty on the outside, soft on the inside artisan bread?
NOTHING!
Well, except there is one thing. There's simply not enough of the crusty/crispy outside!
Lucky for me, my kids will 100% of the time give me their crust in exchange for my soft inside bread pieces.
So I like to think I made this recipe for you guys. For the wonderful people in the world who eat too much bread at one sitting simply because they only wanted an extra slice for the crust.
I get you, I do.
This recipe is the “bomb.com”, “legit”, and “sweet bro” according to three very happy children who are experimenting with talking like teen TV stars.
CRUSTY, NO-KNEAD ARTISAN BREAD BOWLS!
Do you know what that means?! That means you have more crispy crust all to yourself!
And for those who just adore the soft center, you now have it all wrapped up like a little present just for you!
WHY YOU WILL LOVE WHOLE WHEAT NO-KNEAD BREAD BOWLS – YEP THERE'S MORE
- A firm, crusty exterior means that your bread bowl isn't going to turn to mush 2 minutes after you fill it with soup, unlike most bread bowls.
- This recipe just so happens to be made of predominately whole wheat – triple bonus points there.
- Unlike traditional no-knead bread that takes up to 24 hours to make, these bread bowls can be ready in just 5 hours!
- Cute, they're just so flippin' cute.
HOW TO MAKE NO-KNEAD BREAD BOWLS
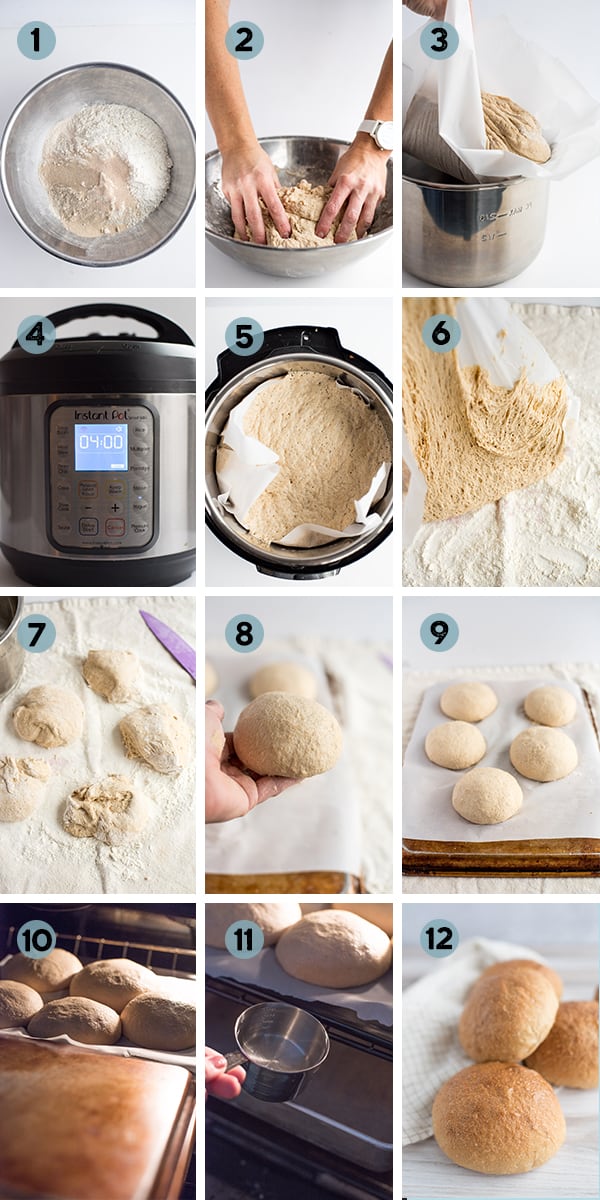
- Mix together both flours, wheat gluten, salt, and yeast
- Add water and mix it up with a spoon or by hand. It will be shaggy and sticky, that's a good thing
- Place dough on a piece of parchment paper and set inside the Instant Pot liner
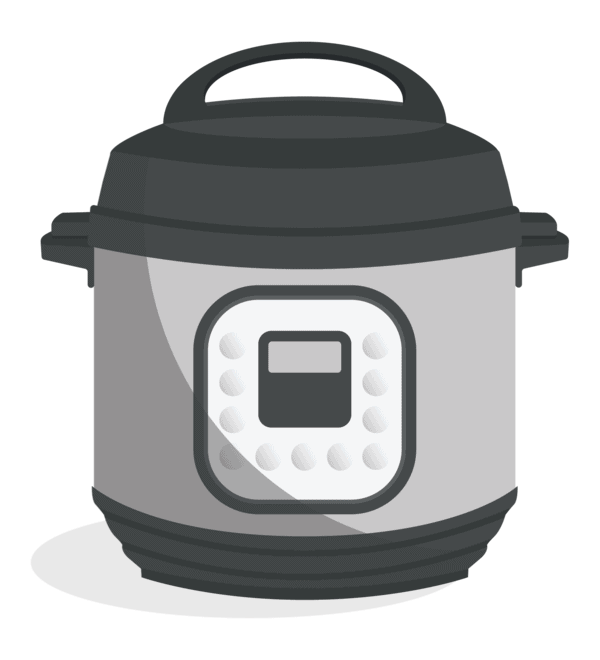
- Set Instant Pot to YOGURT – LOW and adjust time to 4:00
- After 4 hours the dough will be puffed up and have small bubbles on top
- Lift the dough from the pot and scrape it onto a floured work surface
- Cut dough into 5 or 6 equal pieces
- Form each into a tight ball
- Flip a sheet pan upside down, cover it with parchment paper, and place rolls on top. Cover and let rise 45 minutes. Place a pizza stone on the middle rack of the oven and a metal pan on the bottom rack and preheat oven to 450°F
- After the dough has risen, carefully pull the parchment paper and rolls from the sheet pan onto the pizza stone inside the oven
- Pour 1 cup water into the bottom pan and quickly shut the door to trap the steam inside
- Bake until deeply browned and crisp
SEE RECIPE CARD BELOW FOR DETAILED COOKING INSTRUCTIONS
TIPS FOR MAKING AMAZING BREAD BOWLS
- I LOVE my large, rectangular, enamel covered pizza stone! I highly suggest purchasing one at some point in your pizza making life. However, a large round pizza stone can also work here. Cooking 6 bread bowls on a round pizza stone proved to be a little awkward when I tried it. Instead, place the sheet pan with the bread bowls on top of a preheated round pizza stone. This worked perfectly for me.
- If you don't own a pizza stone, go ahead and bake the bread bowls on a regular sheet pan. They won't be as crisp on the bottom, but they'll still be delicious.
- Use WHITE WHOLE WHEAT FLOUR. Regular whole wheat flour (AKA red wheat) is much too dense and strong in flavor for these bowls.
- Weigh the flour! I've made it with those exact weights so many times, it works!
- Don't omit the wheat gluten. Wheat gluten is inexpensive and works wonders in making whole wheat bread stay light in texture.
- If you want larger bread bowls, divide the dough into 5 pieces. I personally prefer 6 smaller bowls because I don't care to eat such a large bread bowl and I didn't want to see all my hard work going to waste!
- Crusty bread is always best hot out of the oven. As it cools, the crust will soften. To crisp it up again, I throw them under the oven broiler for a few minutes. An air fryer would probably work really well for this too!
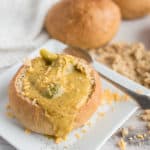
HOW TO PREPARE A BREAD BOWL FOR SOUP
I'm quite picky about how this is done, so listen up!
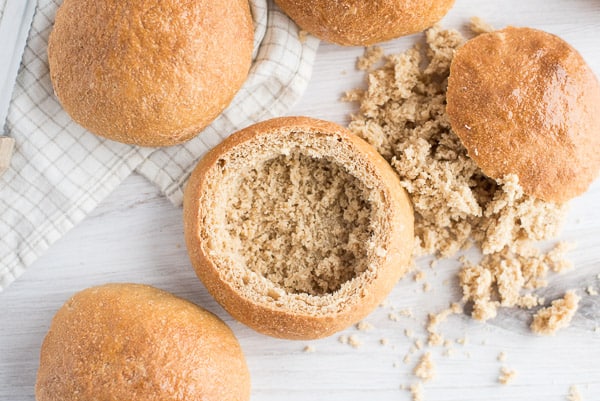
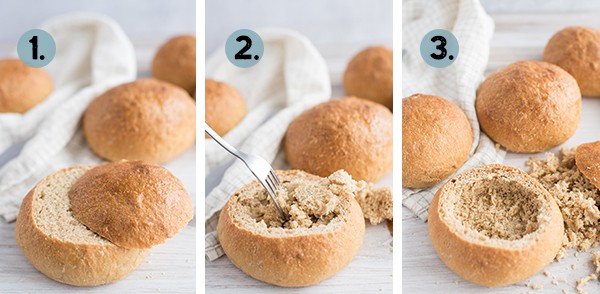
- Cut a small piece of the top of the bread bowl
- Use your fingers or a fork to tear out the center (a fork works great because it doesn't mush the bread)
- Tear out as much bread out as you can without tearing through the crust. This will make it so you have plenty of space for soup, plus lots of soft bread to dip as you eat
HOW TO STORE, REHEAT, AND FREEZE NO-KNEAD CRUSTY BREAD
- Store: Let bread cool completely then place inside a bread bag or ziplock. Press out as much air as you can and seal. Store at room temperature for up to 4 days.
- Reheat: To restore the crispy crust, reheat under the oven broiler for a few minutes.
- Freeze: Place cooled bread in a freezer safe ziplock, press out as much air as you can, and seal. When you're ready to use them, allow them to thaw completely at room temperature, then reheat them as suggested above.
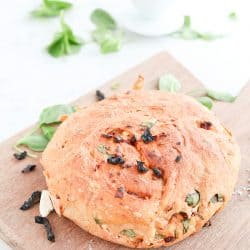
VARIATIONS OF CRUSTY BREAD
These rolls were inspired by my popular Whole Wheat No Knead Crusty Bread recipe, but I believe you could turn any of the following variations into mini bread bowls:
- Whole Wheat Cranberry Pecan No-Knead Crusty Bread
- Whole Wheat Rosemary Asiago Crusty Bread
- Whole Wheat Jalapeno Cheddar No-Knead Crusty Bread
- Whole Wheat Sun-dried Tomato, Feta, and Spinach No-Knead Crusty Bread
Can you imagine having a mini loaf of Rosemary Asiago bread to eat your soup from?! I'm trying this as soon as my family forgives me for making them eat soup for 28 days straight.
Soup season is the best food season and I do hope you will make it extra memorable with these amazing little bread bowls.
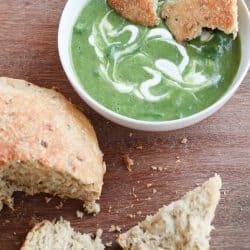
Perhaps you're wondering what to put in your bread bowls? Don't you worry, I've got soup recipes galore and more coming all month!
BEST SOUPS FOR BREAD BOWLS
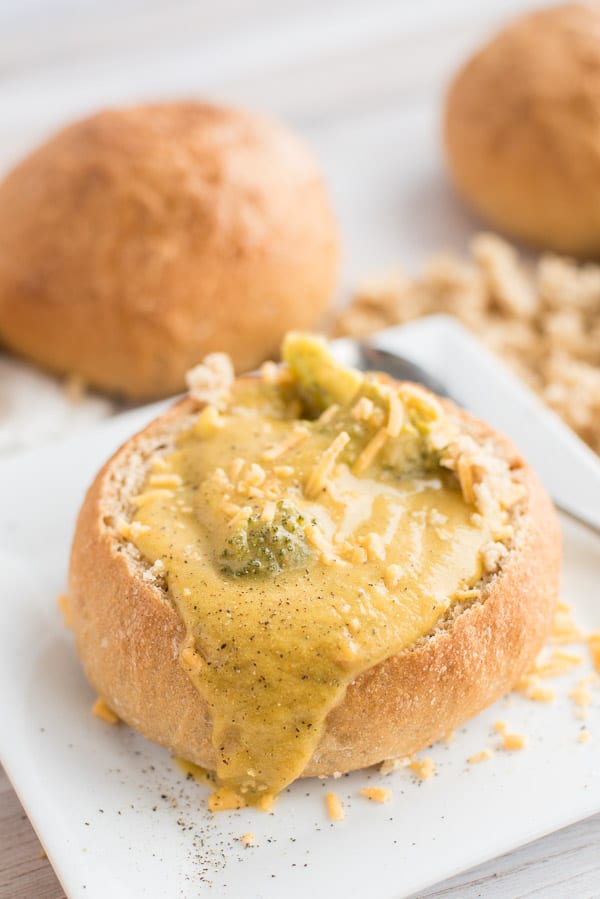
Creamy soups are best for bread bowls. Broth soups tend to soak through the bread too quickly. Try these:
- Instant Pot Healthy Zuppa Toscana Soup
- Instant Pot Red Lentil Soup
- Instant Pot Chili
- Broccoli Zucchini Cheddar Soup
- Instant Pot Creamy Chicken and Corn Chowder
- Instant Pot Baked Potato Soup
- Instant Pot Tomato Basil Soup
MORE WHOLE WHEAT BREAD RECIPES I RISE IN THE INSTANT POT
TOOLS/INGREDIENTS USED TO MAKE WHOLE WHEAT NO-KNEAD BREAD BOWLS
- Instant Pot
- Rectangle Pizza Stone – LOVE THIS
- Round Pizza Stone
- Whole Wheat White Flour
- Wheat Gluten
- SAF Yeast – THE BEST!
Whole Wheat No-Knead Bread Bowls
Whole Wheat No-Knead Bread Bowls ready and waiting for all your favorite soups!
- Prep Time: 10 minutes
- Cook Time: 25 minutes
- Total Time: 5 hours
- Yield: 6 1x
- Category: Bread
- Method: Oven
- Cuisine: American
Ingredients
- 4 ½ cups (18 oz) white whole wheat flour
- 2 cups (8.5 oz) white all purpose flour
- ¼ cup wheat gluten
- 1 tablespoon salt
- 2 teaspoons yeast
- 3 cups room temperature water
Instructions
- In a medium bowl, mix together flours, wheat gluten, salt, and yeast.
- Add the water, and with your hands, mix until the majority of the flour is incorporated, but the dough is still a slightly shaggy looking ball.
- Note: If the dough is still quite wet and sticky, sprinkle an extra tablespoon or two of white flour on top and gently fold it in. You want the dough to be tacky, but not so wet and sticky that it coats your hands when you’re working the flour in.
- Place on top of a piece of parchment paper and lift it into the Instant Pot liner.
- Secure the lid. Press yogurt, then adjust until the screen reads LOW. Adjust time to 4:00 and wait for the beep to indicate the cycle has started.
- After 4 hours, the dough will have puffed up a bit and have small bubbles on top. Grab the sides of the parchment to lift the dough out of the pot and place it on the counter.
- Sprinkle flour on your work surface. Flip a sheet pan upside down and line it with parchment paper; keep it close by.
- Scrape dough onto the flour (it will be sticky, that’s okay) and toss it in the flour a bit so it doesn’t stick to the counter.
- Cut dough into 5 or 6 equal sized pieces.
- Form each piece of dough into tight, round balls, sprinkling them with extra flour if they are too sticky to handle. Tip: Once you smooth the dough into a ball, pinch the extra dough at the bottom so they will keep their shape better. Place each ball onto the parchment lined, upside down sheet pan.
- Cover the dough with greased plastic wrap and allow them to rise for 45 minutes.
- While the dough rises, place a large, rectangular pizza stone on the middle rack of the oven (see notes if you don’t have a rectangle pizza stone). Place a metal pan (like a 9×13 brownie pan) on the lower rack of the oven as well. Preheat the oven to 450°F.
- When the dough is ready, carefully slide the parchment paper (with the rolls) from the sheet pan onto the pizza stone in the oven. Pour 1 cup of water into the metal pan and quickly shut the oven to trap the steam inside.
- Bake for 25 minutes until the bread is deeply browned and crisp all over.
- Remove the bread bowls from the sheet pan and place on a cooling rack. This will keep the bottoms of the bread from going soft.
- For serving, cut off the top of the bread bowl. Scoop out the center of the roll and set it aside for dipping. Fill bread bowl with a creamy soup. Thin soups will soak into the bread too quickly and disintegrate the roll.
Notes
- If you don’t have a large rectangle pizza stone, but have a large round one, preheat your round pizza stone the same way. Line a sheet pan as you normally would (not upside down) then when it’s time to bake the rolls, place the entire sheet pan on top of the pizza stone to bake.
- If you don’t have a pizza stone at all, simply bake the rolls on a sheet pan. They won’t get as crispy on the bottom, but they will still be good.
- I suggest weighing the flour for the most accuracy.
- If the dough is too sticky when forming the balls, add extra white flour until you can easily handle and shape them.
- For larger bowls, divide dough into 5 pieces. For smaller bowls, divide dough into 6 pieces.
- You can use all white flour if desired. 100% white whole wheat flour is quite dense.
- I never use red wheat. It is strong in flavor and will make heavy, dense rolls.
- The wheat gluten in the recipe helps the dough to stay light.
- For soup, I like to hollow out the roll, spritz with olive oil, then place under the oven broiler to crisp the insides a bit. This keeps it from going soft too quickly once the soup is added.
- The bread bowls will lose the crispy crust after sitting at room temperature for a few hours. Throwing them under the oven broiler for a few minutes will bring back the crusty exterior.


How would you make this without an Instant Pot?
Marsha, you can allow the dough to rise at room temperature. The recipe I altered this from used an overnight rise.
Could you treat the raw dough like your bagel recipe – freeze the shaped buns and thaw before letting them rise and bake? Then you could make these on (relatively) short notice.
Bllue, Oh that’s so hard to say . . . No knead dough acts a little bit differently, I’m not sure if it would work or not. But I’m VERY curious now. I might try it with one roll the next time I make them. Let me know if you give it a try!
I don’t know when I’ll be physically able to try this variation (health issues – NOT covid thank goodness) but when I’m can, it’s high on my list of recipes to try . . . 😀
Really good. It was neat to have it rise in the Instant Pot! That was a new one for me. And it is a nice “quiet” recipe since it needs no kneading. The tip about broiling the bowls after spraying with olive oil was neat too. Thank you.
Joan, I’m glad you enjoyed it!