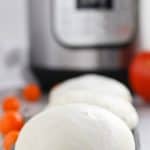
Instant Pot Homemade Mozzarella
Warm, soft, flavorful mozzarella made in your favorite appliance, the Instant Pot!
- Prep Time: 10 minutes
- Cook Time: 30 minutes
- Total Time: 40 minutes
- Yield: 3 mozzarella balls 1x
- Category: cheese
- Method: Pressure Cooker
- Cuisine: Italian
Ingredients
Scale
- 1 gallon whole or 2% milk (see notes about milk brands to use)
- 3/4 cup water (divided)
- 1/4 teaspoon lipase (optional, see note)
- 2 teaspoons citric acid
- 1/4 teaspoon single strength liquid animal rennet
- 1 1/2 teaspoons kosher salt
Instructions
- To 3 small cups, add 1/4 cup of coolish water to each. In 1 of the cups add the lipase and stir to combine (it won’t dissolve completely). To another cup add citric acid and stir to combine. To the final cup, add the animal rennet and stir to combine.
- Pour milk into the pot of the Instant Pot and clip a thermometer on to the side (or have one close by so you can closely watch the milk temperatures). Press yogurt and adjust until it says “boil”.
- Warm milk to 55°F.
- When milk reaches 55° F, use a whisk and stir while pouring in lipase mixture. Continue to whisk briskly while pouring in citric acid mixture
- Continue to heat milk until it reaches 88°F; press cancel to turn off the Instant Pot.
- Gently stir in rennet mixture using a slow up and down motion with the whisk, about 30 seconds. Place a lid on the pot for 5-10 minutes, until there is a clear separation of the whey, otherwise known as a “clean break”. The whey should be clear and yellow. If it is still whitish or milky looking, put the lid on and wait another 5 minutes.
- Using a long knife, spatula, or off set icing spatula (basically something long enough to reach to the end of the pot) Cut the curds by making 4 or 5 vertical cuts from the top to the bottom of the pot. Then repeat this process on the other side to make a checkered pattern on the top.
- Press yogurt, adjust to “boil”, and lightly stir the curds until the temperature reaches 105°F. The temperature will vary slightly depending on where your thermometer is in the curds and whey, so just move your thermometer around and take the pot off the heat once it reaches an average of 105°F. Cover the pot and let sit 1 minute.
- Using a slotted spoon, scoop large curds into a strainer (the Euro Cuisine yogurt strainers work great for this) and press lightly to remove some whey. Tear 3 pieces of plastic wrap (large enough to wrap 3 balls of your final mozzarella) and set them to the side (don’t stack them on to of each other!)
- Transfer curds to a microwave safe pyrex bowl and microwave curds for 1 minute.
- Tip: This next step will need some food safe gloves because the cheese is about to get quite hot!
- Gently fold the the cheese over and over then drain the released whey. Microwave for another 35 seconds, gently fold cheese over and over, drain released whey. One last time – microwave for another 35 seconds, drain excess whey, sprinkle with 1 1/2 teaspoons kosher salt, and continue to fold and knead until cheese becomes smooth, shiny, and stretches like taffy (this is my favorite part!).
- Working quickly so the cheese doesn’t cool and become unstretchable, break cheese into 3 pieces and create a tight, smooth ball shape with each.
- You can eat it hot at this point (so good!) or shape it and chill it for later. It will store in the fridge for 1-2 weeks.
- Tip: While the cheese is hot, it will not maintain the shape very well. I like to wrap it tightly in a piece of plastic wrap and twist the plastic wrap to create a tight ball. Once the mozzarella cools, it will maintain this round shape. You can also try dipping the hot mozzarella in ice water for a 10 seconds, but I feel like the plastic wrap works better.
Notes
- The mozzarella is the best when eaten warm right after it’s made. Chilling the mozzarella will change its texture a bit, but it is still delicious! Cube it up for skewers, slice it up for topping pizza or grilled cheese sandwiches, or partially freeze it, then shred it. If you have extra, I have frozen the cheese successfully. In fact, I insist that it melts and oozes better after it has been frozen and thawed!
- As I mentioned above, lipase is optional. I feel like it makes a softer more flavorful cheese, but you can definitely make it without.
Find it online: https://instafreshmeals.com/instant-pot-homemade-mozzarella/