
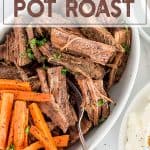

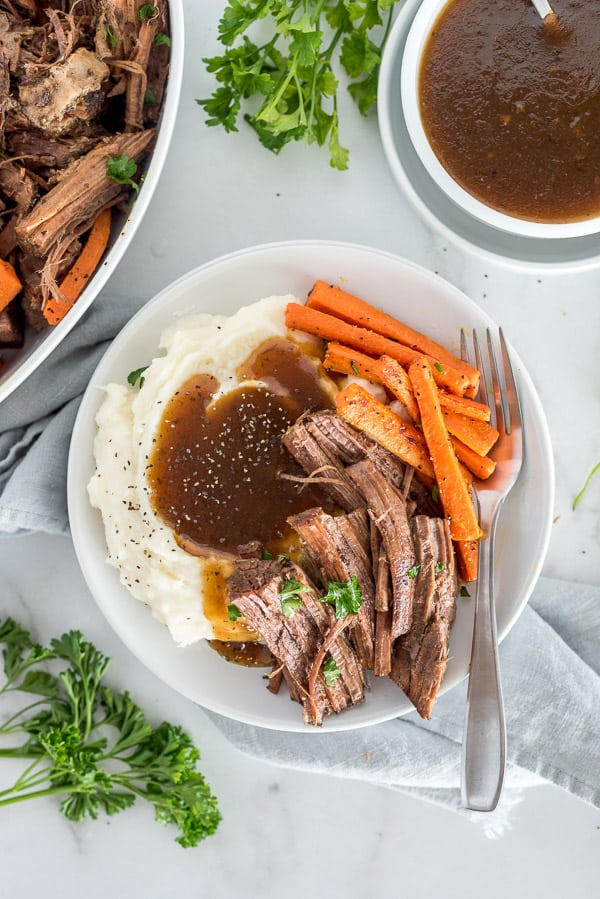
If you want a pot roast to rival your grandma's (sorry grandma), give this Instant Pot Pot Roast a whirl! Tender, juicy, and flavorful! Plus, find out which cut of meat is the best below. This recipe goes amazing with Instant Pot Mashed Potatoes.
If I had to pick the number one most requested recipe since I started this blogging journey, it would be the classic Sunday Pot Roast. Not even kidding. But I reeeeeaaaallly dragged my feet on it. To say I got burned out on pot roast as a kid is an understatement. Anyone else's family have that Every. Single. Sunday?
But my love for you all prevailed and with the help of a friend and my little sis, have we ever delivered the goods!
WHY THE INSTANT POT IS THE BEST FOR THE POT ROAST
I’ve tried a few different methods for cooking a pot roast, but I always come back to my Instant Pot. The pressure cooked version does the best job at infusing flavor and moisture into the entire roast. In my experience, once you find the right cooking time, the pot roast comes out predictably tender each and every time. A pressure cooked pot roast is also a huge time saver when compared to an oven braised or slow cooked version. No more starting your roast cooking 8-12 hours before dinner time! Plus, I just love the fact that you can press a button and walk away until dinnertime!
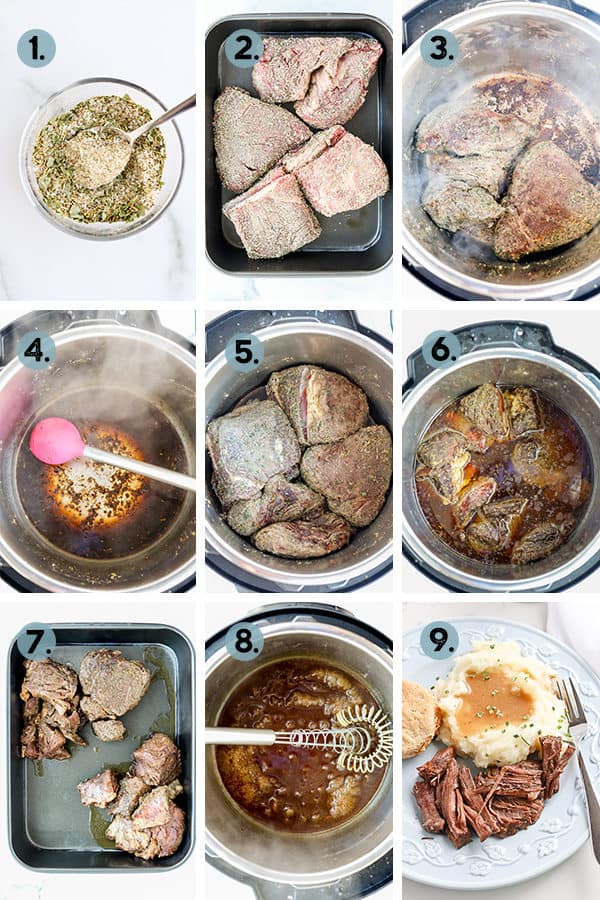
STEP BY STEP PROCESS TO MAKING THE BEST INSTANT POT POT ROAST
- Mix up the magical pot roast seasonings (more on that below)
- Coat the meat well
- Use saute on the pressure cooker to brown each side, set meat aside
- Add broth and scrape up the browned bits
- Return meat to the pot
- Cook for 90 minutes with a full natural release (ideally)
- Set meat aside
- Strain fat from pot liquid, make gravy
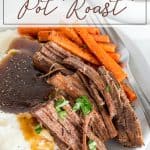
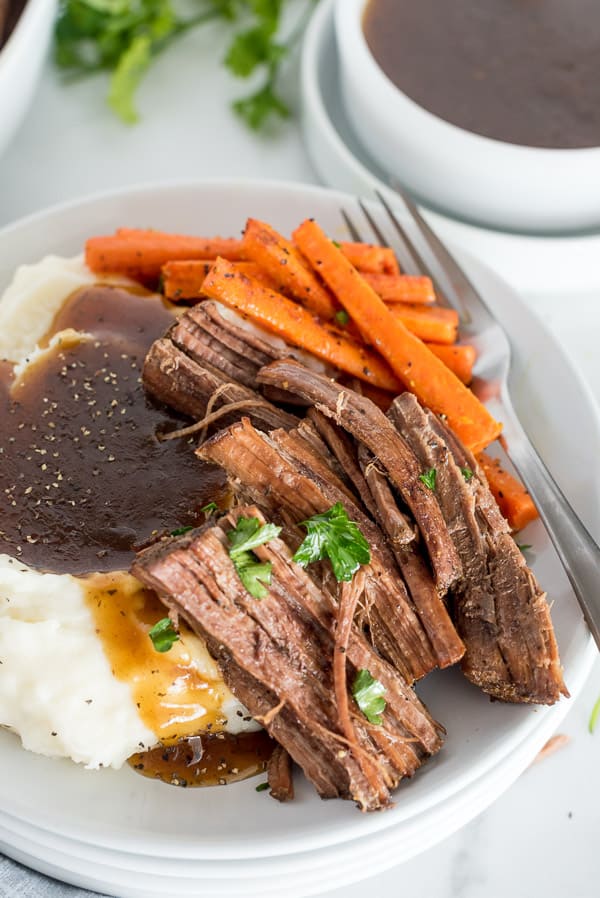
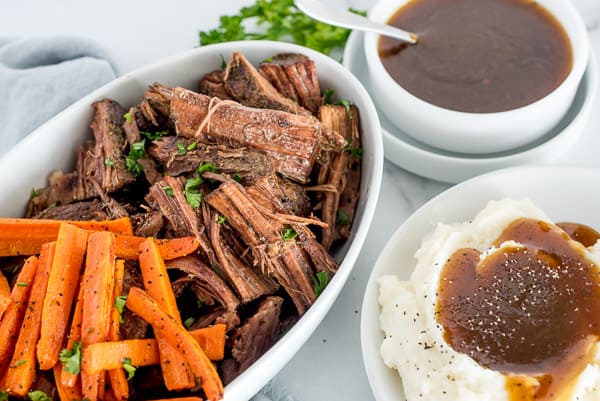
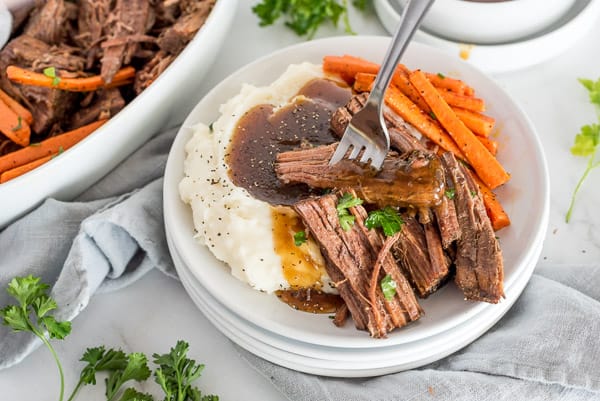
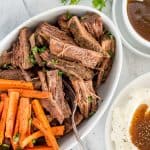
- Slice, shred, or chunk meat and enjoy with a big scoop of mashed potatoes!
SEE RECIPE CARD BELOW FOR DETAILED COOKING INSTRUCTIONS
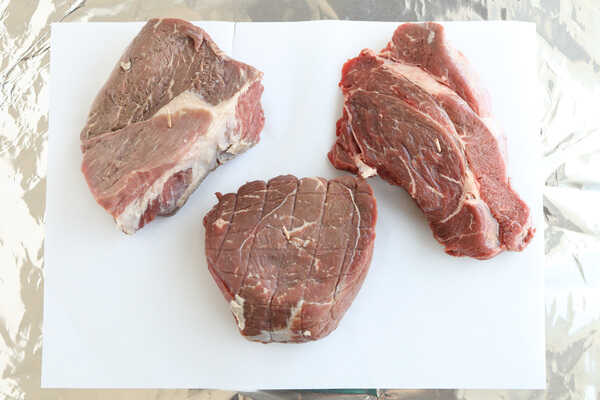
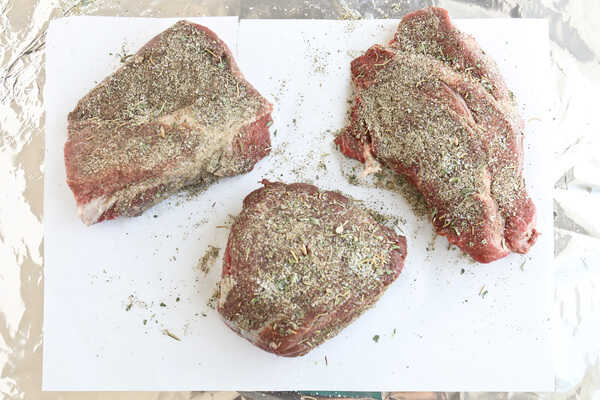
My ability to keep things simple is nonexistent, so I decided to make this classic Pressure Cooker Pot Roast recipe a bit more exciting by testing it on the three most common cuts of pot roast beef: sirloin roast, chuck roast, and rump roast. All this so I could answer the question:
WHAT IS THE BEST CUT OF MEAT FOR A POT ROAST?
Now I know every one of you is probably thinking chuck roast, but read on for my fascinating results . . . Other people do find this fascinating, right? Where my peeps at?
FYI: The toothpicks in these images were put there to help me remember which cut of beef was which.
Here are my results:
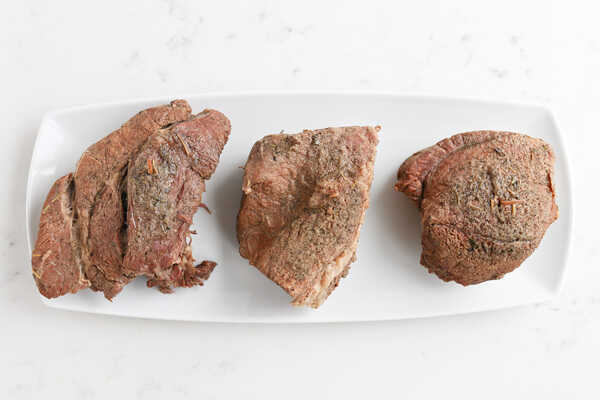
Chuck Roast (meat on the left in picture)
- Pros: Unmatched in tenderness. So flavorful and fell apart into delicious pieces simply with the touch of a fork.
- Cons: So fatty! I trimmed some of the fat from the outside, but after it was cooked, there was still so much fat throughout. This results in wonderfully flavorful, tender meat, but by the time I had removed the fat from the meat, I didn't have a whole lot of meat left. I also don't love how greasy it leaves the broth, but that can be remedied with a good fat separator.
Rump Roast (meat in the middle of picture)
- Pros: Juicy, tender, and flavorful with MUCH less fat to discard. In the end, I had quite a bit more meat from a 2-pound piece of rump roast compared to the chuck because there was more meat than fat.
- Cons: Ever so slightly less tender than the chuck roast, but in a blind tasting, my husband wasn't able to tell which was which (meat snob that he is). More expensive than a chuck.
Sirloin Roast (meat on the right in picture)
- Pros: It wasn't falling apart tender, but sliced with ease. It was very flavorful and had a tender, juicy chew that most closely resembled the classic Sunday Pot Roast of my childhood.
- Cons: The tenderness of the meat varied throughout the 2-pound chunk. The pieces near fat globs were a lot more tender than the other pieces (which is understandable). It dried out quickly even while sitting on the cutting board. I suggest slicing it and putting it back in the meat juices so it stays moist. It was quite dry the next day when reheated, but storing it in the juices may solve that as well.
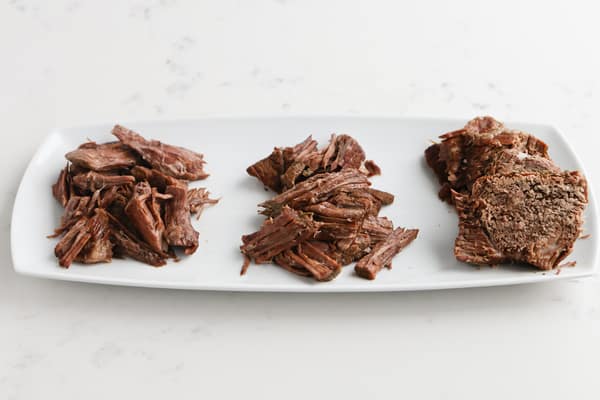
So which one is the winner? I was honestly surprised at how delicious they all were and I wasn't sad about any of them. For me, the winner was hands down the rump roast.
A rump roast is definitely not the roast your friendly butcher might suggest. However, my grandma, roast maker extraordinaire, always used a rump roast. The only reason I remember that is because she would giggle every time she said the word rump, haha! I'm carrying on the tradition and will be buying rump roasts whenever I see them at a killer price.
The chuck roast was a very close second and will be your best bet for being tender and fall apart every single time.
CAN I USE FROZEN BEEF FOR THIS RECIPE?
When I cook from frozen, I do 1 1/2 the original cook time. Where this roast already has a longer cook time, I didn't find it necessary to cook it quite that long. See the recipe below for directions. For a roast, the most important thing is to have it cut into 2 – 3 pound chunks before you freeze it instead of one solid 4 – 6 pound chunk. It will cook much more evenly and be more tender and juicy throughout.
HOW LONG TO COOK A POT ROAST IN THE INSTANT POT PRESSURE COOKER
I cut mine into 2 – 3 pound chunks and cook it for 90 minutes every time. I've experimented with it numerous times and I do believe 90 minutes is optimal. Whether you are cooking a 2 pound roast or an 8 pound, the cook time remains the same.
CAN YOU OVERCOOK A ROAST IN A PRESSURE COOKER?
It’s definitely possible to overcook a roast in the Instant Pot. When overcooked, the roast will be dry and chewy. In some situations, you can pressure cook a roast a bit longer to tenderize it, but most often unfortunately, once it’s been overcooked, the damage has been done. In this situation, slice it up and throw it back into the pot with the juices to help moisten and flavor the meat.
WHY IS MY ROAST TOUGH IN THE INSTANT POT?
To avoid a tough pot roast from the get-go:
- Make sure you are using good quality meat (I highly suggest trying out Butcher Box)
- Look for a roast with even marbling of fat throughout (not just a huge chunk on an end)
- Cook for an appropriate amount of time (I use 90 minutes every time)
If you end up with a tough roast, there are a few things you can do to help it –
- Cut it against the grain and put it back into the pot juices to soak up some moisture
- Pressure cook it for another 10 – 15 minutes (this works surprisingly well)
- Put chunks into a food processor and pulse to shred it. This works well if you're using it for quesadillas, enchiladas, etc
WHAT SIDES GO GREAT WITH THE POT ROAST?
Make sure to serve the Pot Roast with Mashed Potatoes and Gravy.
Okay, this tip is from my mom and is non-negotiable for her. I'll happily eat mine with a cup of horseradish, but if you're on my mom's side, I love these Instant Pot Mashed Potatoes.
OTHER SIDES TO SERVE WITH INSTANT POT POT ROAST:
- Instant Pot Honey Glazed Carrots
- Instant Pot Healthy Potato Salad – No Mayo
- Whole Wheat Focaccia Bread
- More Sides Dishes and Vegetables
HOW TO MAKE GRAVY FROM ROAST DRIPPINGS
If you want a dynamite gravy that takes a little extra effort, use this gravy recipe from Mel's Kitchen Cafe. If you want a super easy one that is still wonderfully flavorful, use the one I wrote below. My opinion is that a fat separator is a must to get rid of excess fat in the broth. I really hate greasy gravy, but I'll leave that decision up to you! It's definitely not a deal breaker.
MORE TIPS ON HOW TO MAKE THE BEST INSTANT POT POT ROAST
USE QUALITY MEAT
It took me a couple of years to admit this really mattered, but the quality of meat and overall outcome most definitely depend on where you buy your meat. For my town, I buy it from Smith's Marketplace (bonus: they'll prep my meat for me!). I don't have a Costco near me, but from what I hear, it's pretty unanimous that their meat rocks the house.
I've recently been testing out the home delivery service Butcher Box to see if it was as great as everyone says it is and I've been really surprised by how incredibly well the meat handles the pressure cooker. The chicken breast stays tender, the pork is juicy, and the chuck roast made the most incredible pot roast I've ever had.
I'm typically not a huge fan of chuck because of how fatty it is, but my butcher box chuck roasts so far have been a happy medium between the typical fatty chuck roast and a leaner rump roast. I'm very, very impressed!
CUT IT INTO CHUNKS
Take your large roast and cut it down into about 2-pound chunks. The taste and texture of the meat is so much better with this simple step. You get more surface area for seasoning and searing which equals flavor. Do it! Or have your favorite, patient butcher do it. Mine knows me well.
POT ROAST SEASONING
If you learn only one thing on this here blog, let it be this: Meat LOVES seasoning, and the spice mix written in this recipe is OUTSTANDING! This spice blend comes from my brother in laws Grandma “Mac” who is well known for her cooking skills and once you try this roast, you will understand why. I've never in my life tasted such a flavorful roast!
BROWN MEAT IN THE INSTANT POT
I'm in the club of, “I know browning adds flavor, but I'm willing to sacrifice some flavor so I don't smell like meat.” In this recipe however, I finally gave in to the fact that the flavor was 100% better when I sealed in those spices and achieved a deep brown crust. However, I'll admit, sometimes I sear 2-3 sides and then call it a day.
To brown your roast in the Instant Pot, set saute to high and wait until the pot says “hot”. Then add your oil and meat and DO NOT MOVE THE MEAT for at least 4 minutes. When the meat releases easily from the pot, you know you've formed a good crust. Flip it and repeat on another side. Depending on how many pounds of meat you are cooking, you may need to do this in batches.
If there is leftover browning at the bottom of the pot, add a splash of water or broth and use a spoon to scrape it up. This will prevent a BURN error from occurring as the pot is building pressure.
COOK MEAT FROM ROOM TEMPERATURE
I don't consider this a deal breaker, but I do believe it helps guarantee a great end result. Let your meat sit at room temp for about an hour before you cook it. It will brown better and be more tender.
LET MEAT REST – USE A NATURAL RELEASE
I know there are differing opinions about this, but I say a natural release is absolutely imperative to tender meat. A quick release sucks all the moisture out of your meat, while a natural release allows the liquids to cool and settle inside the meat. Compare it to a steak that you slice right after it comes off the grill (juices flow everywhere) vs one that you let rest for 10 minutes before cutting (more juices remain inside the steak). Plan for 2 – 2 1/2 hours for this recipe and the pressure cooker will be cooled down and ready to open. I even go one step further with the “resting” stage and let it sit on a cutting board while I make the gravy.
ADD VEGGIES TO THE POT
Cooking vegetables in the pot with the meat will result in extremely overcooked vegetables. Instead, after your roast has cooked and the natural release is complete, set your roast aside, place desired vegetables in a steamer basket, then lower them into the pot to cook in the flavorful juices. The juices will be hot so the pot will come up to pressure quickly. For quartered potatoes, carrots, and celery, I cook them for 4 minutes with a quick release of the pressure once the cooking time is complete.
BEST WAY TO CUT MEAT – AGAINST THE GRAIN
If using a chuck or rump roast, the meat will break apart into chunks with only a fork. If using a sirloin or another type of roast that you plan on slicing, be sure and cut against the grain. This will result in a more tender chew and is much more enjoyable to eat.
CLEAN UP TIPS
Cooking any kind of roast leads to a greasy pot and cutting board and a very potent pressure cooker seal. My preference for an easy clean-up is to throw everything, including the pressure cooker seal (on the top rack) into the dishwasher since it does an amazing job at breaking down oil. If you do not have a dishwasher, I recommend making a VERY hot soapy bath in the sink and allowing the greasy dishes to soak for 15-20 minutes before you give them a good scrub.
I will never, and I do mean never, make a pot roast any other way again. An electric pressure cooker makes it so easy to sear and cook a roast to tender perfection, it's just plain revolutionary.
Whether you suffer from pot roast burnout like I did or you're a Sunday Pot Roast die-hard, give this recipe a try and fall in love all over again!
Enjoy!
WAYS TO USE LEFTOVER POT ROAST
- Instant Pot Tamales or Tamale Pie
- Ultimate Mashed Potato bowl piled high with meat, roasted veggies, ranch dressing or gravy, and Red Pepper Crunchy Toppers – leftover lovin' at its finest
- Italian Sandwich AKA my favorite sandwich of all time
RECOMMENDED TOOLS/INGREDIENTS TO BUY AND MAKE INSTANT POT POT ROAST
OTHER COZY MEALS YOU’LL LOVE!
- Instant Pot Lasagna
- Instant Pot Short Ribs
- Instant Pot Beef Stew
- Instant Pot Pork Medallions with Apricot Sauce
I'd love to hear what you think of my family's favorite Instant Pot Pot Roast! Rate the recipe below and leave me a comment of your experience; thank you!
Instant Pot Pot Roast
Moist, juicy, tender pot roast that will have your grandma asking you for your secrets! Instant Pot Pot Roast for the win!
- Prep Time: 20 minutes
- Cook Time: 90 minutes
- Total Time: 3 hours
- Yield: 8 servings 1x
- Category: Entree
- Method: Instant Pot
- Cuisine: American
Ingredients
For the Roast
- 4 – 6 pound beef roast, trimmed of excess fat and cut into about 2 pound chunks (see notes about which cut to use: rump, chuck, or sirloin)
- 2 tablespoons kosher salt (see note)
- 1 tablespoon dried basil
- 1 tablespoon dried rosemary
- 1 tablespoon onion powder
- 1 tablespoon black pepper
- 1 tablespoon dried oregano
- 1 tablespoon garlic powder
- 2 tablespoons olive oil
- 1 15 oz can beef broth
For the Gravy
- 3 tablespoons cornstarch
- 3 tablespoons cold water
- big splash of Worcestershire sauce (a tablespoon or 2)
Instructions
- Place roast on a large piece of foil for easy clean up. Combine salt, basil, rosemary, onion powder, black pepper, oregano, and garlic powder in a small bowl. Press the seasonings into all sides of the roast.
- Select saute or brown on the pressure cooker. When it says “HOT” add oil.
- Add meat and brown each side for about 4 minutes. This process will take 15 – 20 minutes. May need to be done in batches if you're cooking more than 4 pounds of meat.
- Turn the pressure cooker off.
- Remove beef from the pot and set on a plate.
- Pour beef broth into the pot and scrape up the browned bits from the bottom. Return beef to the pot.
- Secure the lid and turn pressure release knob to a sealed position. Cook at high pressure for 90 minutes.
- When cooking is complete, use a natural release.
- Set beef on a cutting board to rest. Pour drippings from the pot into a fat separator then pour it back into the pot, discarding the fat. If you don’t have a fat separator, you can skim the top of the liquid with a spoon to remove some of the fat, or just skip this step.
- Combine cornstarch and water in a small cup. Using the saute function, bring the drippings to a simmer and whisk vigorously as you pour in the cornstarch slurry.
- Continue stirring for 1-2 minutes as it thickens. Add a splash of Worcestershire sauce and season with additional salt and pepper if needed. If the gravy is too salty, you can adjust by mixing up more cornstarch slurry to dilute it.
- Slice, shred, or chunk the roast and serve with a side of mashed potatoes and gravy.
Freezer Meal Instructions:
- Prepare beef according to step 1. Cover a sheet pan with non stick foil and place the meat on the pan, making sure meat chunks don’t touch. Once frozen, place the meat in a freezer safe gallon size ziplock. Label the bag with the recipe, date, and contents.
- When ready to cook, continue with step 2.
- Cook at high pressure for 2 hours, proceed with the rest of the above directions.
Notes
- The amount of salt written in the spice rub is perfect for the roast, but can result in a very salty gravy. If your roast is small or you are sensitive to salt, only add 1 tablespoon instead of 2.
- If the gravy is too salty or flavorful, add water to balance it out.
- For meat that shreds or chunks easily, use a rump or chuck roast. Rump roast is leaner and sometimes not as tender. Chuck roast is more fatty and quite tender. Sirloin roast is tender but best for slicing
- The browning step is essential for maximum flavor and to really seal on the seasonings. However, the meat is still delicious and tender if you choose to skip this step
- Leftover meat freezes well in a freezer safe ziplock bag for up to 3 months.
Recipe adapted from my wonderful friend Heather and brother in laws Grandma Mac


Gonna cook this on weekend!
Fabulous recipe. I used rump. Mine was already just shy of two pounds so I didn’t cut it.
Jeri, I’m so happy you liked it! It’s a fam favorite around here. Thanks for letting me know!
I love pot roast and do use the pressure cooker. It’s a game changer. I would love to try a a rump roast. Have always used chuck roast. Actually years ago we could get round bone pot roast but it doesn’t exsist anymore. I use to be able to get rump roast in Chicago but I live in AZ now and it’s no where to be found. So sad. You just can’t get meat cuts like you use to.
Following. I love rump roast too. It is what my mother used for stovetop braised pot roast and wonderful sauerbraten and it was always tender and had lots of beefy flavor. And it sliced nicely too. I wish I could find a timing chart for rump roast. I have two in my freezer waiting for more information
Rita, try out this recipe for the rump roast, I think you’ll love it!
Pam, I know the chuck is supposed to be more tender, but I will always be team rump roast. This recipe makes it every bit as tender without all the fat globs! I’ll have to look for round bone roast, I’ve never heard of that cut.
Thank- you for the info. I’m just wondering I like a roast med rare should I bother with instant pot or just roast it in the oven? I tried the instant pot for my roast and it was tough and dry. Only put in for 45mins. So I’m little turned off using it again for that. Since it’s.just my bf and I, I usually only by 2lb or just slightly over.
Melody, You may want to try the oven then, if you like it pink. My experience is that every time I try to cut the cook time down, it turns out really tough. I’d say go for the recipe as written, it’s really amazing 🙂
Pressure cooker / moist heat = Pot Roast
Oven / dry heat = Roast Beef
Marci what do I do if I don’t have a pressure cooker. How do I cook the beef to make your pot roast recipe that I really want to make. Can you give me a bit of how to? Thank you.
Ruth, if you have a slow cooker, I would brown the meat on the stovetop, then slow cook it on low for 6-8 hours until it’s falling apart. I’ve never done it this way, but that’s pretty standard for a slow cooker. Let me know if you try it!
Thank- you for the info. I’m just wondering I like a roast med rare should I bother with instant pot or just roast it in the oven? I tried the instant pot for my roast and it was tough and dry. Only put in for 45mins. So I’m little turned off using it again for that. Since it’s.just my bf and I, I usually only by 2lb or just slightly over.
I had a 3.5 pound sirloin roast. Took your advice and cooked for 90 minutes in the instant pot. Turned out great! Fell apart. 🙂
Janis, Yay! It’s magic, I swear!
Hi Marcy! My German mother always made pot roast from a whole rump roast and I am so glad to see your recipe! We like to leave our roast whole and slice it rather than shred it.
I have a 4-pound rump roast. Could you please give me some guidance on the timing for a WHOLE 4-pound rump roast?
Rita, I would use the same cooking directions in the post, It will work great!
If over-salted, peel a potato & cut it into big pieces. Add it to the gravy after turning the IP off, let it set for ½ hr, & remove the potato & discard. It will soak up the excess salt.
Maggie, really!? That’s genius, I didn’t know that trick. Thank you!
Came out wonderful! Had a 4 pound roast that I cut into 2 pieces. I initially cut down slightly on the herbs and salt and the gravy was slightly salty, but not too much that we didn’t enjoy it. Will cut down on the salt a little more for next time. Thank you for the recipe!
What size Instant Pot do you use? I just bought an 8 quart Instant Pot, and if use a 6 quart, do you know how the recipe would differ for an 8 quart? Thanks in advance!
Cecilia, I have a 6 and 8 quart but I always test my recipes in a 6 quart since that’s what most people have. For this pot roast, I keep the time the same. If it’s something like cake or eggs, I feel like I have to adjust the time a bit. I’m making this exact roast for dinner as we speak 🙂
The meat (rump roast) cooked wonderfully. But, waaaay too much seasoning for a 4.2 lb roast. I left the basil out knowing I wouldn’t like it, cut everything else except salt down by 1/2 to 2/3, still too herby for me. Next time no rosemary, and only a small amount of oregano. And so salty there’s no way I can use the broth for gravy. I buy my herbs and spices from Penzeu’s and they are far stronger than grocery store ones, which may have been part of the problem. Also, I’m simple… just salt, pepper, and maybe small hints of onion and garlic would have been better.
Funny I’m reading this today. I made a chuck roast in my quick cooker, followed the recipe that came with the Pampered Chef cooker which was 35 minutes, the meat was cooked but was so tuff, I was so disappointed. Do you think it was the time is was cooked for?
Laraine, I’ve tried every cook time under the sun and I always fall back to this one. Give it a try and let me know if it was better for you!
Wow, this was really good. But, even though I only used half of the suggested ammount of salt, it still turned out to be very salty. Also, there was way too much seasoning mix (rub) for a 4lb roast. Next time I will cut the salt down to 1/4 tbsp, and the other seasonings down to 1tbsp.
I mean, 1/2tbsp for the other seasonings; not 1tbsp.
James, thanks for letting me know your experience James! I agree, I adjust the seasonings a bit depending on the size of roast.
Made a 3 lb. rump roast using this recipe. Turned out perfect- tender and flavorful. My husband is an instant pot skeptic and pot roast is his favorite meal So this made a true believer of him!
Kris, that’s so great to hear! That roast is a good one to make believers for sure.
I have a 2 1/2 lb. sirloin roast and have read somewhere to cook for 60 min with a 15 min natural release. It wasn’t as tender as I would have liked it. I would love To try your recipe but am just confused as to how long to cook a roast under 3 lbs?
Shannon, I keep the cook time the same for any size since I’m cutting them into smaller chunks anyways. Give it a try, this is a really good recipe!
I just wanted to add how much I like the seasoning mixture. I’ve been mixing up a big batch to keep in a jar in the cupboard. I’m calling it the “Marci-Mix” and I’ve it on steaks, in meatloaf, and basically anything beefy. Recently I used it to replace the spices in a beef barley soup recipe and it turned out great.
Laurie, I am so unbelievably honored to be in your spice cupboard, haha! And that’s an excellent idea, I’m thinking this mix on steak fries would also be amazing.
is. The. BEST.
Hi there!
Just tried this last night. Had a 3 lb Sirloin, so adjusted time to 45 min High, with slow release. Since I didn’t have beef broth and wanted to reduce the salt, I added 15 ounces filtered water with 1 teaspoon Worcestershire sauce. AMAZING!!
Your blend of spices took the meat over the top.
Thx for a keeper!
Debta, Isn’t it fantastic! Grandma knows best!
This pot roast turned out fabulous! The gravy was a bit salty, so I would cut the kosher salt in half next time, but thoroughly enjoyed this recipe–the meat was so tender.
Peggy, isn’t it great! I go back and forth on wondering if I need to adjust the salt. Sometimes I just add some water to the drippings if it tastes too salty.
I’m making this for the second time today. Great, easy recipe that makes wonderful gravy for mashed potatoes!
Barb, yes! The gravy is AMAZING!
Thank you for this recipe. I made it tonight. Everyone loved it. The only thing I would change the next time I make it, is to use less kosher salt. I’m going to only use 1 tbsp. I put mushrooms in the gravy and made mashed potatoes, & roasted carrots, broccoli, and zucchini. YUM!!!
I stopped trying to cook rump roasts years ago. That’s the only cut I ever cooked when I got married and started cooking. Don’t know what happened but seemed as though one day the rump roasts were awful…tough & dry no matter what method I used (oven, slow cooker, etc). Began using chuck roasts and that’s all I’ve cooked for the past many years. I have used this recipe for a chuck roast and it was delicious. When shopping today, I saw this beautiful rump roast and decided to take a chance again using your method. Boy, am I glad I did. Turned out great! My husband said best roast you’ve cooked in a while. I said well you can thank Marci for that!😘
Glinda, haha! That just made my day! My grandma always used rump roast so I was so excited to see this work in the pressure cooker. I’m so glad you got to enjoy it!
Thank you for the very informative info on the types of meat.
I like the recipe for this seasoning and the method of cooking better than the typical “slow cooker” one. 🙂
FYI, after reading various recipes, I decided to cook some rump roast (less fatty than chuck roast, as you mentioned) using 60min pressure time and natural release, and the meat still came out quite tender.
So delicious! Definitely a keeper. My whole family loved it and went back for seconds and my cousin asked for the recipe. I didn’t have onion powder so I added two tablespoons of Penzey’s freeze dried shallots with the stock. I strained the cooking liquid before thickening…. yum! Thank you!
Suzanne, it’s a keeper, right!? I haven’t even tested another pot roast recipe since making this one. I’ve never tasted anything better 🙂
So if I have a smaller amount of meat, should I adjust the time accordingly? Suggestions for 2 or 4 lbs.
Pam, I would keep the same cook time. I usually cut my meat into 1-2 pound chunks so no matter how many pounds I have total, I use the same cook time. You will love this roast!
This sounds like a great recipe… Just curious I bought fresh sliced mushrooms that I usually serve with my pot roast when do I add the sliced mushrooms
Lila, I’m not sure how you like your mushrooms cooked with your roast. You could always put them in with the roast to cook to flavor the gravy, but if you want them with more texture, you could take the roast out after it’s done to rest, then throw the mushrooms in the pot and pressure cook them for 2 minutes. Or, how I like them, I would saute them in some butter on the stovetop while the roast cooks and serve them on the side.
The roast was awesome. I used a touch of Gravy Master and mixed it into the rioux I made. The gravy was awesome as well. Great recipe !!!
Edward, if a recipe comes from Grandma, you know it’s gonna be good. I’m glad you enjoyed it!
This was a solid recipe. I had the butcher cut me a 6# roast. I was a little surprised it was so expensive. I cut my roast into 3 pieces. It was really tasty and hands off. That’s why I like to use IP recipes. I will never compromise taste for ease and I love that I don’t have to.
Amy, I agree, food should taste just as good coming out of the pressure cooker! I’m glad you liked the roast 🙂
When/how would you add potatoes and carrots to this recipe. Also, if I wanted to add red wine would I add that in addition (how much) to the beef broth or part of the broth amount? Lot’s of questions, but I don’t want my small 3 pound rump roast to be dry. I do like the idea of some wine because it adds some acidity to the meat that helps soften the meat. Great posts and your recipe sounds wonderful. Like others have said, it’s hard to find a rump roast recipe, everyone uses chuck. Thank you.
JR, I would substitute some of the broth with the wine. After the roast is done, pull it out to rest then add your potatoes and carrots and cook for another 4 minutes, then a quick release of the pressure. They’ll come up to pressure quickly because the contents will still be very hot. Let me know how it goes!
I looove this recipe. I use a sirloin tip roast, tenderize with a Jaccard meat tenderizer, and reduce the pepper by half. My Littles thought it was too peppery when I followed the recipe. Sharing on our Cattle farm website!
Bethany, I’ve never used that meat tenderizer, do you like it? I’m so glad you liked it, alterations and all! Send me a link when you share it so I can check it out 🙂
This is seriously the best meat tenderizer. I use it on chicken, venison, beef and pork.
https://www.amazon.com/Jaccard-45-Knife-Meat-Tenderizer/dp/B000A3I3G0/ref=asc_df_B000A3I3G0/?tag=hyprod-20&linkCode=df0&hvadid=167134584690&hvpos=1o1&hvnetw=g&hvrand=953601429819860151&hvpone=&hvptwo=&hvqmt=&hvdev=m&hvdvcmdl=&hvlocint=&hvlocphy=9013110&hvtargid=pla-201484929841&psc=1
I love my Meat tenderizer mine is not a Jaccard but it is Stainless Steel Steven Raichler best of BBQ. Manual one.
If you like Costco meats, check with the butcher. I’ve read that their meat is Jaccarded (or a similar process) before you buy it.
Im in the process of making this. I browned the meat as directed. I added a little more oil after first batch cuz it was dry.
Finished n drained excess oil before adding broth. Bottom looked burnt. Added broth n tried scraping with wooden spoon. Had to switch to a metal spoon. Something told me it was “burnt bits” and not “brown bits” so i tasted it.
Lucky i did because it was totally burnt. Dumped it out and had a really hard time getting the charred bottom clean. I know it wont have the same flavor as the browned buts but at least it wont taste burned. Its cooking now.
Anyone else have this problem??
Good, stuff. I was a little hesitant of the 90 minute cook time, but it was right on the money. And the Gravy…OMG Becky.
Michael, I’m so glad you liked it! I can sincerely say it’s the best I’ve ever had, and I agree it makes the best gravy ever.
Do you still sear it if cooking from frozen?
Lisa, You can, it doesn’t do quite as good of a job, but I’ve also just rubbed the seasoning all over it frozen and cooked it without browning it. It worked great!
I made this last night, with a 4.2 pound Chuck roast (or “beef blade roast” as it was labelled in my Canadian grocery store; I think that’s the Same thing??). It was DEEEEELICIOUS. I had a question though–do you always do 90 min, regardless of the weight of the meat? Your recipe calls for a roast of 4-6 pounds so wouldn’t the cooking time be longer for something nearer the 6 pound side than for the 4 pound side….? Just curious!
Thanks for the recipe! 🙂
Erin, It’s pretty awesome, right?! Yes, I always do the same cook time because I aim for my chunks of meat to be cut down to about the same size regardless of how much meat I have in total. Does that make sense?
You don’t use the wire rack to put the meat on
Regina, no I don’t, I feel like it gives it more flavor to be in the juices
What is the thickness of meat we’re talking about here?
Laurie, I cut them into about 1-1 1/2 pound chunks.
This is, by far, my favorite roast recipe and so easy to prepare! Thanks for another favorite, Marci!
Amber, yay I’m glad you liked it! I’m glad to hear you’re using your Instant Pot too 🙂
I do the chuck roast, a good quality brand, cut it into 1inch cubes and pressure cook for 10 min and 10 min natural release and it is awesome. Use about a cup broth, maybe some soy or teriyaki. I do cut off as much fat as possible.
I once forgot to close the vent.
Mark, That’s a great idea to make the process super quick, thank you!
Why would I have ran out of water? Or broth? I had to add I’m more water.
Janeal, That is weird, between the added liquid and the liquid that comes from the meat, there is always plenty. Was your lid leaking steam by chance?
I had a difficult time finding a recipe specifically for a pressure cooked rump roast (most recipes online use chuck). I tried your recipe today – ohemgeee – it turned out perfectly! It was super tender, but still firm enough to slice. My entire family loved it and already asked when I would make this again.
So happy I discovered your blog today! I am a new fan/follower 🙂
Patty, And I’m so happy to have you here 🙂 I agree, this roast is pretty incredible. It turns even a rump roast in something super spectacular!
Hi! I have been making my pot roast with this exact same spice mix for 20 years! It’s my grandma’s famous recipe for pot roast. I have never found any other spice combo to match it! I wonder if you got it from her. My cousin, Jed, is married to your sister Maegan. Any chance she shared our Grandma’s recipe with you?
Thanks for posting this wonderful recipe and perfecting it for the Instant Pot. I love your blog, cookbook, and tips!
Jenny, Maegan made this pot roast for me awhile ago and I begged her for the recipe, and she said it came from her mother in law, so yes, it probably is your grandmas 🙂 There’s a note at the bottom of the recipe where I talk about Maegan’s genius inlaws, so many amazing recipes coming from that family! It is hands down the best roast I’ve ever, ever had! I’ve met Jed’s Grandma, I’m not sure if that’s who it came from or not, now I wish I’d thought to ask so I could thank her.
Yes, the recipe came from our Grandma! She is an incredible cook and wonderful lady! I’m sure she would love to know that her recipe has been “published.” 😊
Jenny, Oh wow, that’s so cool, I’ll have Maegan let her know and I’ll add her name to the recipe.
This was so good and the entire family loved it! Thanks for the tips and recipe.
Beckie, I love hearing that! You’re so welcome!
Hello Marci,
You are most welcome and thank you for this great site. Very informative.
Bon Appetite
Hello to all,
Great recipe!!! I have used a very similar one in my IP for the past year or so. Same technique & time, just different spices/gravy. Not my favourite but the hubby gobbles it down. My favourite cuts are rump, sirloin tip & eye of the round, all of which I have read are not specifically recommended for the IP because they are so lean. Not so!! As I have come to learn. I like my roast medium-rare (pink and juicy) and my taste buds balk when eating beef cooked for so long even though it might be tender. By accident (looking for something else), I came across this technique. It sounded too weird but I was intrigued. I forewarned the hubby he might be having KD for supper. The only difference from the above recipe is the time. After beef is seasoned & seared etc., add a cup or more of stock to deglaze the pot. I usually toss in a garlic clove, a halved onion, a couple small celery stalks. Place beef on a trivet above the stock. Seal the lid & set on High Pressure for 5 minutes. (Yep – 3 mins). At the end of the 3 minutes cook time, turn off and set to Warm for 2.5 hours and walk away. After 2.5 hours I opened the lid and was graced with the most flavourful, medium rare, fork tender Sirloin Tip roast I have ever had. Sliced thin it is perfect for French Beef Dip sandwiches and the stock is devine. While the hubby will eat med-rare beef in sandwiches, he prefers the (90 min) cook time for Sunday roast beef dinner. So we have compromised. I cook his way one time; and, the next time, I cook my way.
BTW, I doubt the 2.5 hr method would work on any other cuts such as chuck, blade, etc. Those are cuts that definitely need a longer cook time under pressure.
Bon Appetite
Laura, such great insight! Thank you. I have never tried it rare like that, but that would have my husband drooling. I will have to give that a go. How did you figure out that method? I haven’t seen that anywhere else.
Hi Marci,
While I would like to take credit, I found it online at https://foodieandwine.com/roast-beef-recipe/. The picture had me drooling all over my keyboard.
But I did tweak it to suit my needs. I like to use the broth for gravy or for my Beef Dip sandwiches so I don’t go for rubbing the beef with olive oil or adding all the spices mentioned and I don’t put the beef in an oven proof dish. I want the juices dripping into the broth so I just sear it lightly and season with a little salt & pepper and put it on a trivet above a cup or more of beef broth to which I add a clove of garlic, an onion cut in half and a few stalks of celery & maybe a good pinch of dried thyme.
Bon Appetite
Laura, now you have me drooling. Thank you for the recipe and tips!
Hello to all,
Great recipe!!! I have used a very similar one in my IP for the past year or so. Same technique & time, just different spices/gravy. Not my favourite but the hubby gobbles it down. My favourite cuts are rump, sirloin tip & eye of the round, all of which I have read are not specifically recommended for the IP because they are so lean. Not so!! As I have come to learn. I like my roast medium-rare (pink and juicy) and my taste buds balk when eating beef cooked for so long even though it might be tender. By accident (looking for something else), I came across this technique. It sounded too weird but I was intrigued. I forewarned the hubby he might be having KD for supper. The only difference from the above recipe is the time. After beef is seasoned & seared etc., add a cup or more of stock to deglaze the pot. I usually toss in a garlic clove, a halved onion, a couple small celery stalks. Place beef on a trivet above the stock. Seal the lid & set on High Pressure for 5 minutes. (Yep – 5 mins). At the end of the 5 minutes cook time, turn off and set to Warm for 2.5 hours and walk away. After 2.5 hours I opened the lid and was graced with the most flavourful, medium rare, fork tender Sirloin Tip roast I have ever had. It can be sliced paper thin and it is perfect for French Beef Dip sandwiches and the stock is devine. While the hubby will eat med-rare beef in sandwiches, he prefers the (90 min) cook time for Sunday roast beef dinner. He claims he likes his beef ‘dead’ and tells everyone I like to ‘chase mine around the plate’ before I eat it. So we have compromised. I cook his way one time; and, the next time, I cook my way.
BTW, I doubt the 2.5 hr method would work on any other cuts such as chuck, blade, etc. Those are cuts that definitely need a longer cook time under pressure.
Bon Appetite
Hello so sorry for double posting, didn’t think it went through and then I noticed a typo. See below posting 3 mins under Pressure, not 5 minutes. Thanks
I had a 5 pound rump roast yesterday so I cut it in half and decided to do two different recipes (in case one was terrible 🙂 ). I made this one in the instant pot and another in the oven (it was a 5 star recipe). Let me tell you, this recipe was SO MUCH BETTER!!! Definitely only using this from now on. Fall apart tender and so easy.
Evelyn, that is music to my ears! I love hearing other people share my love for this method!
Thank you for sharing this recipe! We love it the roast melted in our mouths. Best roast we have ever had!
Melissa, quite different from the “not so melt in your mouth” pot roasts I had as a kid, haha!
This was delicious! I’ve had trouble finding a good recipe for rump roast, as it always turns out dry. This was moist and very flavorful! I had a 3.5 lb rump roast that I cut in half lengthwise and followed directions (halved the seasonings because my roast was smaller). I used the liquid after cooking the meat for gravy and didn’t add a thing except a little water to extended it a little bit. After I removed the meat to sit, and the broth to make gravy, I put potatoes carrots and onions in the pot and pressure cooked for 4 minutes just like another recipe suggested. Vegetables were done perfectly. I then took the potatoes out and mashd them. It was the least hands-on roast meal that I’ve made with just a little prep time in the beginning. Will definitely be making again anytime I make a rump roast.
Sharla, I prefer a rump cause I like it less fatty. It’s amazing what a pressure cooker can do for it right!? That’s a great idea with the vegetables. I’m glad you enjoyed it!
Would you cook it for same amount of time if it is a 3lb roast?
Michelle, Yes!
Wow. I’m impressed. Only my second time using my electric pressure cooker, but I’m marveled at the way it pushes flavors thru the whole piece of meat. And this combination of spices was perfect. I mean PERFECT. A tad too salty for my taste, but easily rectified next time. Thank you so much for sharing this recipe. Don’t see how anyone could not throughly enjoy sitting down to dinner with a plate of this fab pot roast.
LoriSTL, I’ll admit to being a total salt lover, I tend to season with all spices a bit aggressively :). I’m so glad you adjusted it to your liking so you could enjoy it even more!
I used 5 lbs of sirloin roast and 30oz of beef broth because I wanted lots of gravy. I did 90 minute cook time and natural release and my meat came out looking like the pics on the rump roast. Fall apart amazing. I made the gravy recipe that was linked it was awesome. Will make this again. My large family loved it.
Monica, I love hearing this! The timing seems to work well for just about any cut.
Just made this again -only used a Top Round roast–shoe leather toughness and it ended up tasting so perfect, so decadent, so tender and incredibly flavorful–Mr Picky is requesting this on a regular basis! Thanks for all your fantastic recipes, Marci!
Karen, miraculous thing this pressure cooker is :). I have a Top Round in my freezer, I’m gonna have to test it. I love when I can help create something good for Mr. Picky!
Me too!!!
Was really great. I added a some red pepper flakes and studded with garlic cloves. Used
Beer plus broth for liquid. Didn’t need gravy just used juices. Made 10lbs for Christmas Eve dinner (dbled spices etc). Had 40+ppl and was a big hit…all gone
Sylvia, That’s a big roast! I’m glad you enjoyed it 🙂
made this on christmas eve, for a potluck (much of the area where i live is out of power after a bad storm) – easy and delish. i put it in, went on a walk and came back to a “burn” message (not sure why) – but, added beef broth and sautéed on low for a wonderful gravy. Thank you for this! It’s lovely and easy.
Dana, It’s possible the browned bits didn’t get scraped off the bottom well enough. I’m so glad it still worked out and tasted good!
My husband said this meal was a 10!!! So delicious!! I switched it up slightly. First, I halved the seasonings because I only was using about half the amount of meat it called for. I also fried up some onions in the instant pot before I browned the meat and put them on top of the meat once I put it back in the instant pot to cook. I also cooked up some fresh mushrooms in a pan until tender and threw those in the gravy once it was done. AWESOME! Thank you!
Desiree, Oh wow, I want to have roast at your house, those additions sound right up my alley. I’m so glad you guys loved it!
I’d like to make this tomorrow, with a side of mashed potatoes as you suggest, for a family of 4. Is there enough gravy to use both for the meat and for the mashed potatoes? If not, should I just add more broth to start and more corn starch at the end? Or would I be better off just buying gravy mix?
Luke, If you eat gravy, like I eat gravy, you’d probably want to add some extra broth. I prefer that to gravy mix. The gravy is quite flavorful from all the spices so extra broth will still be flavorful.
I cut the recipe in half for my 3 quart instant pot. Pressure cooked approximately 20 min per lb with natural release 10-20 min.
How can I cut this recipe down to a 3qt instant pot?
Megha, As long as the chunks of meat are similar in size as I state in the directions, just use the same cook time. It works great!
5stars. Delicious. Followed recipe exactly except cut everything in half since I have a small 3 guart instant pot. Will definitely become a routine meal.
Debbie, I’m so glad you liked it! I hardly ever made roast before owning a pressure cooker 🙂
Can I put onions, carrots, potatoes and celery in with the roast and cook it like I would in a crockpot? This will be my first experience with my brand new Insta pot. Just wondering if the vegetables can stay in as long as the meat and not be too mushy.
I’m a very busy person with four different businesses that I run and I bought an Insta pot to hopefully cook larger amounts of food faster, so that I can have enough volume for my family and to have enough food leftover to take to a couple of elderly people in my life.
Thank you for your information, your writing is wonderful and I’ve enjoyed everything I’ve read! Thank you for your contagious positivity!
Carol, I have before, they do go quite soft so I leave them cut up quite big if I do that. Even being soft, the flavor of carrots that get cooked in that juice is amazing! I’ve seen some recipes that say to add the veggies in to cook after you remove the meat, so you could always do that. The veggies could cook while the meat rests a bit on a cutting board. If I did that, I would cut them into large, bite size pieces and let them cook for 5 minutes with a quick pressure release.
Bless you, your comments came on a much needed day when my optimism needed a bit of a boost. You will love life with an Instant Pot!
Great IP recipe! I divided a 5# rump into 3 slices and rubbed with a little olive oil plus a generous amount of lawrys carne asada seasoning and let the beef come to room temperature (about an hour). They did not stick and browned fantastic! I delglazed with 2 cups chicken stock since that was all I had available. I followed all of your advice and instructions except different spices and broth. I served “aus jus” with my sauteed green beans and steamed baby yukon potatoes. My family rated it downright mouthwatering! Thank-you Marci!!
April, now that sounds amazing! I’ve never seen a carne asada Lawrys seasoning. I want to try this!
Happy to find this as a change of pace from pot roasts with tomato sauce. Delish! I used 1 tsp of black pepper instead of 1 Tbsp–1 Tbsp just seemed like an awful lot. Even with the 1 tsp, it was still VERY peppery. Is it just me? I guess next time I will go down to 1/2 tsp or omit entirely?
Jennie, I’ll admit, I like a little heat and I like meat WELL seasoned. But I’m glad you could find a good amount for you! I agree, I much prefer this taste than the tomato sauce versions. I’m glad you could enjoy it!
I am pretty new to using Instant Pot, do you use the trivet at the bottom while cooking the meat? Hubby loves Pot Roast so planning on trying this tomorrow with a sirloin roast I already have in the freezer. We have a local farmer we buy our beef and use a local processor/butcher. I like the idea of cutting down the roast in 2 lb chunks. I think I will ask him to do that for me in the future.
Donna, I don’t use a trivet in this recipe. I feel like the roast really sucks up all that good flavor without the trivet. I adore butchers that will do my meat prep for me!
I love eye of round roast. Especially for company since it can be sliced and makes for a great presentation.
Rachel, I’ll have to try this! Have you used eye of round with this recipe?
Hello,
I came across your page by searching for which cut of meat is best for a pot roast; my husband grew up with brisket, made with lots of herbs and red wine, refrigerated in the cooking liquid overnight then sliced very thinly across the grain and the slices arranged back in shape in the liquid overnight again. I’ve generally used either round or chuck, whichever is on sale. We don’t like shredded meat, hence not interested in using chuck again, while round tends to be dry like cardboard. So…..I spotted what looked like a nice piece of rump roast and got it. Had I seen that the label also said “bottom round” I might not have gotten it……..and had I seen sirloin I would have gone in that direction…..
So all that aside, I am not a recipe cook (unless I’m baking), more of a method cook – so I cut my almost 3 lb rump roast in half, started with 2 large onions thinly sliced and a head of garlic, separated, peeled, hard ends removed, but otherwise I left the cloves whole. I had those sautéing in EVOO while I made some mirepoix in the food processor, with 2 stalks of celery with leaves and a
carrot, added that to the other aromatics, and then I put the herbs (I’m a big fan of herbs and cook a lot by aroma) into a large zip top bag, first grinding up my rosemary a bit in my mortar & pestle, and I put the cornstarch right in the bag with the seasonings. (That may turn into a problem if it’s stuck to the bottom of the pot – but apparently the secret to why Chinese restaurant meat is almost always so tender is that they put cornstarch on before cooking the meat, and it does something magical to help tenderize it. If necessary I can always scrape down the pot bottom with a big wood spatula, which I should have already done!)
So……. I put the meat in the zip bag, moved it around and smashed the herbs into it, then I took out all the vegs from the pan, added a bit more oil, and browned the meat on all sides. When that was done, I took the meat out and dumped the vegs back in along with about half a 1 lb bag of baby-cut carrots, put the meat on top, dumped on a bag of steam-in-bag tiny red potatoes, halved, a few slurps of worcestershire, a can of reduced sodium beef broth, and a healthy slurp (maybe 1/2 c?) of Pinot Noir. Since I have less than 3 lbs of meat total, I set the IP timer to 50 minutes, high pressure, and we’ll see how it goes!
I’m sure that overall it’ll be delicious; I generally use more-or-less this combination of ingredients, and all I did differently this time is the cornstarch and the rump roast, and I’ll use NPR (I’m usually too impatient for that, but I get your point abut NPR). I’ll let the meat sit a bit, and then hope I can slice it without it falling apart.
PJ, how did it turn out? I’ve never heard of the cornstarch idea, did it cause any problems? Thanks so much for all those details!
Hi
Can I cook it in a regular oven without a pressure cooker ?
Dani, absolutely, the spice rub is amazing!
I received for Christmas a small pressure cooker. Is this the same as an instant pot? Do you really cook a roast for 90 minutes? Can’t wait to try this recipe!
Karen, an Instant Pot is a brand of electric pressure cooker. There are several different brands like Cuisinart, Zavor, etc. Yes, I like the texture of the roast best at 90 minutes. It’s flavorful and falls apart. You’ll love it!
I can not wait to try this. My Mom, God rest her soul, always used rump roasts! Great memories. Thank you!
Sharon, Thank you for sharing. I can’t make a rump roast without thinking of my grandma 🙂
Excellent roast! We used rump roast as you recommended, and it came out very tender and flavorable. The gravy was yummy!
Catherine, I’m so happy to hear that! I love the herby/spicy gravy!
This pot roast is AMAZING and I highly suggest making it! The flavor is outstanding and even my 2-year old liked it. I particularly liked the flavor of the porcini mushrooms although I didn’t like their mouthfeel (is that a word?). They were kind of chewy while the rest of the meal was so melt-in-my-mouth yummy. Is it possible to just grind the mushrooms and use the powder as a spice then add sliced mushrooms with the carrots at the very end? Thank you!!
Oops just realized I combined 2 pot roast recipes and this one did not suggest adding porcini mushrooms. So yay! That’s probably the right call. 🙂
Kim, haha, I was so confused, I was about to go check the recipe wondering why I put mushrooms in the recipe. I like the idea of grinding mushrooms up and using them to flavor the broth though. That would be amazing.
Thank you for this wonderful recipe! Im always looking for new ways to use my instant pot. This one is definitely a keeper!
Thanks Jami! I’m so glad you liked it!
I made this for dinner last night and my husband said, “This is one of the best dinners you’ve ever made.” I had to agree! This recipe is definitely a keeper. Thank you so much!
Samantha, I love comments like this! If I can get a recipe approved from my husband, I know I’ve struck gold!
I didn’t have dried herbs, so used a large handful of fresh rosemary, savory, and tons of fresh garlic in the pot. This recipe was amazing. Love love it. Made enough to send my kids home with leftovers. That’s the best part!
Kathy, I’m so excited you liked it, being that your a pro chef and all:). Great ideas! Perfect way to use up an overflow of herbs too.
I would love to try this recipe I just found. How long should you cook a 3.5-4 lb roast?
Karrie, I would just cut it into 2 chunks and then cook it for the same time it says in the recipe. The size of the chunks is more important than the size of the entire roast in this case.
If the day ended right now (it’s 8:48AM), my day would have been made complete by finding this page of your blog! Not being a beef connoisseur (not even a big fan of it), I have been clueless as to how to make a decent roast. This is sad, as in December, hubby and I will be married for 45 years. Anyway, I have the IP and have enjoyed most all of the recipes I’ve made in it. When you first posted this article/results of your experiment, I jumped on board and bought a rump roast. I followed your instructions and the roast was highly praised by hubby and an 85-YO friend, who said she has never been able to make this good of a roast and that this might even be better than the roast her mother used to make (and it her opinion, WAS the best!) Well, hubby and I moved to a condo in June, and I’ve not yet located the box of recipes that I have yet to file. This is one recipe I needed to relocate–I came looking online today to see if I could find it in a pinch. After a few misses, I found you! Thank you so much for this WONDERFUL recipe/method!
Julie, comments like this make my whole world! I’m so thrilled to hear that you have finally mastered the ol’ pot roast! Your hubby is a lucky man 🙂
Is the cooking time longer if using a whole 5lb. Rump Roast that isn’t cut into cubes?
Mona, I always cut my roasts down a bit, so yes, I would imagine the cooking time would be a bit longer.
Thank you for the feedback. 😊
My daughter-in-law and I were discussing the benefits of Insta Pots this weekend. She was worried that a person would not be able to get that nice ‘crisp’ on the outer portion of roasts. Am I to understand you were able to retain that crisp with the searing?
Brynne, She’s right, that crisp won’t be there after it cooks. The reason I finally gave into searing it first was because it kept the rub seasonings on better which made the meat TONS more flavorful. I’ve never done it with this roast, but with shredded pork I love to throw it under the broiler for a few minutes to get some crispy, charred bits.
I was looking for instructions from frozen that you said were in the instructions. I cannot find it.
Willem, The instructions are within the actual recipe card, right below the regular recipe instructions
I just made this roast recipe and it turned out fantastic! Probably the best roast I have ever made. All The extra prep time is SO worth it!
Kylee, I got pretty much burned out on roast from having it every Sunday as a kid, but this recipe has made me a fan again. I’m so glad you loved it!
This turned out fantastic! So nice to have a good recipe with regular herbs and spices and not a bunch of prepackaged seasonings! Hard to find recipes like that sometimes. This one is an absolute keeper, my family went nuts for it! Thanks for sharing this recipe 🙂
Stephanie, That’s so good to hear! This spice blend came from my little sister’s in laws, and I agree, it’s the best!
Are you cooking all 6 lbs or 2 lbs?
Pat, I’m cooking all 6 pounds, I just cut them down into 2 pound chunks. Does that make sense?